The AI Accessibility Widget is an app developed by UserWay. It provides automated solutions for adhering to WCAG (Web Content Accessibility Guidelines) standards and ADA (Americans With Disabilities Act) regulations.
The widget offers comprehensive features that allow people with disabilities to navigate and use your website. You can find it in the Semrush App Center.
How Can AI Accessibility Widget Help Me?
Here are a few ways the AI Accessibility Widget can help you:
- Open websites up to more visitors, including those people with disabilities, for enhanced reach
- Improve your site's compliance with the WCAG, ADA, Section 508, EN 301 549, and the AODA
- Automatically check that your website aligns with WCAG (Web Content Accessibility Guidelines)
- Avoid legal risk and fully comply with the law
- Increase credibility and user engagement
- Prioritize your most significant accessibility issues
- Focus on site-wide and template-level violations affecting most of your site’s pages
- Scan for issues that may only appear on specific screen sizes and devices
- See how your accessibility can improve performance
- Improve click-through-rates (CTRs) and earnings-per-click (EPC)
- Reduce bounce rates and increase conversion rates
- Expand your reach with our international feature support: Receive localized support in 53 languages
Pricing
You can try out the app for free; you'll have access to the widget with limited functionality.
If you'd like access to a complete ADA-compliant tool, you can subscribe to the app with one of the four plans available to you based on your website's traffic:
- Add a website with <100K page views per month - $49 per month
- Add a website with <1M page views per month - $149 per month
- Add a website with <5M page views per month - $569 per month
- Add a website with <10M page views per month - $699 per month
What’s Included in the Free Plan
Here are the tools available in the user interface with the free version of the app:
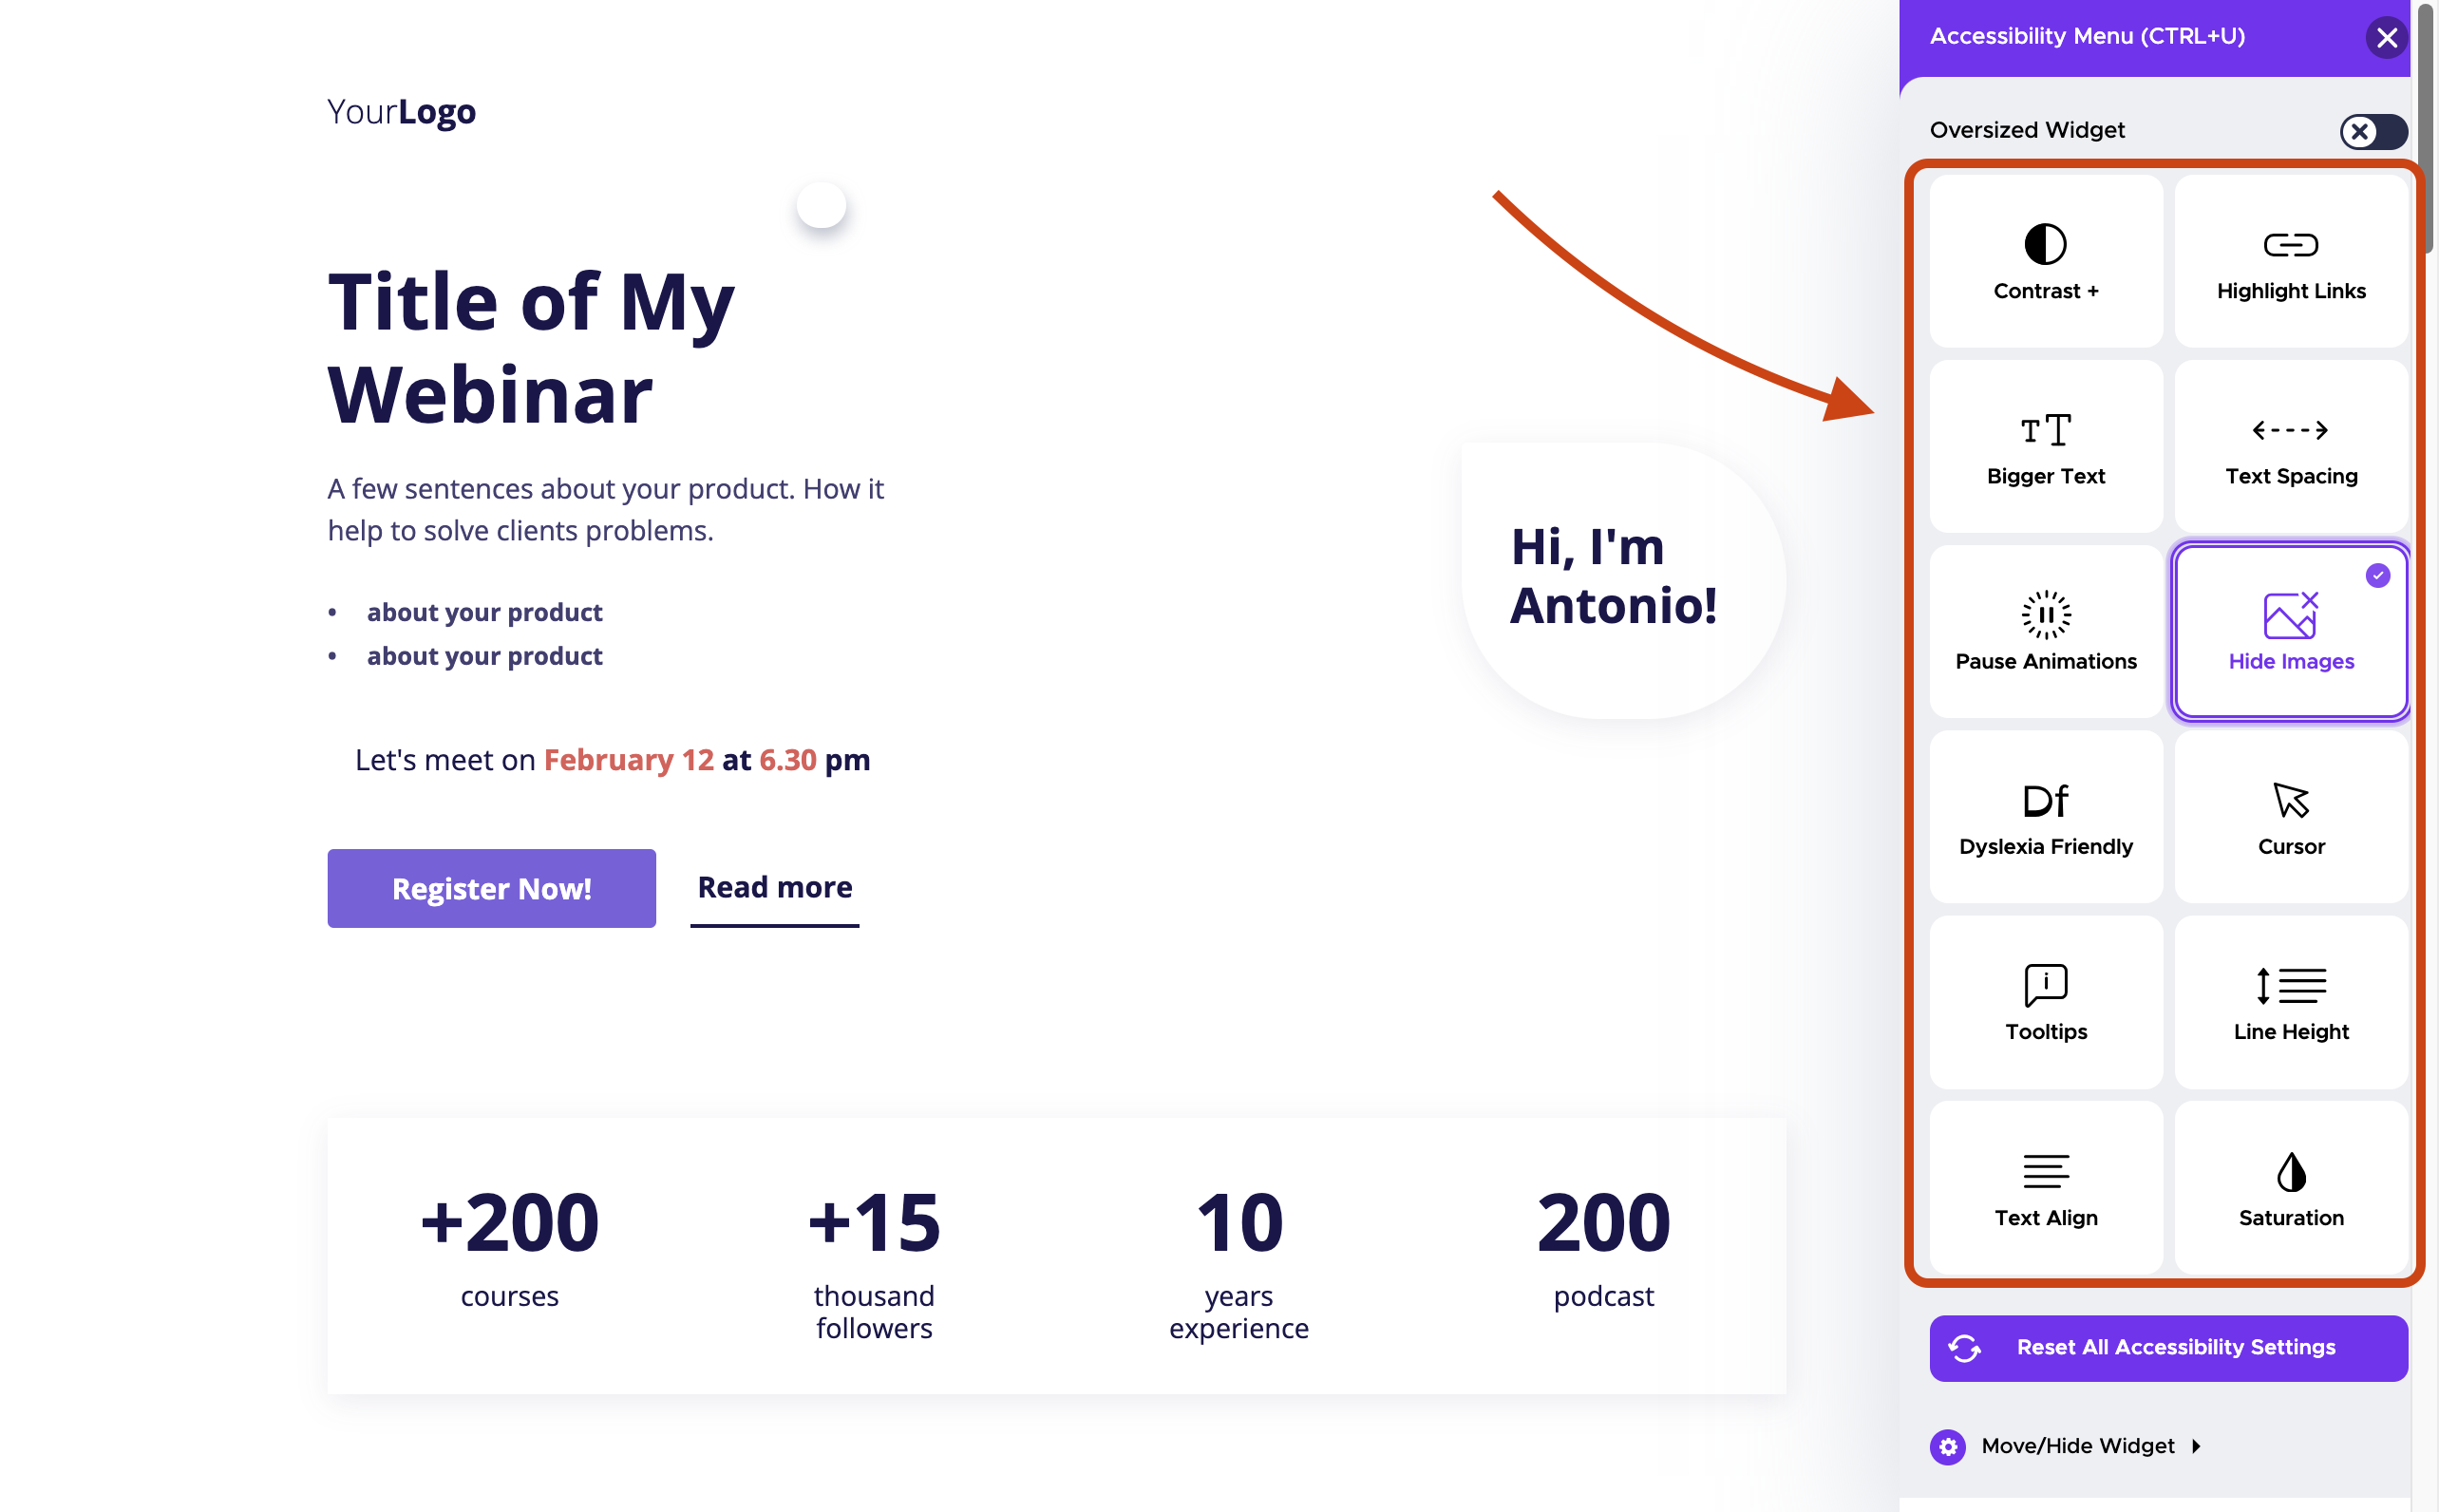
- Contrast +: Adjusts the color contrast between text and background, aiding users with visual impairments or difficulty discerning certain color combinations. There are three settings available in this feature:
- Invert Colors: Full-color inversion for all site elements provides greater perceived color depth, making texts significantly more accessible to read while reducing eye strain for color-blind and visually impaired users.
- Dark Contrast: Boosts the contrast of all site elements with a high-contrast dark color theme. One-click remediation to inaccessible and non-compliant low-contrast elements, texts, buttons, and form fields.
- Light Contrast: Boosts the contrast of all site elements with a high-contrast light color theme. One-click remediation to inaccessible and non-compliant low-contrast elements, texts, buttons, and form fields.
- Highlight Links: Emphasizes links, buttons, and other interactive elements, making them more noticeable for users with visual impairments or those who may have difficulty distinguishing links from regular text.
- Bigger Text: Enlarges the text size on a digital interface to improve readability for users with visual impairments or those who prefer larger text. Cycles on-screen texts through four different levels of text size increases. Makes every part of your site instantly more readable.
- Text Spacing: Modifies text and line spacing for improved readability for dyslexic and visually impaired users. Offers three degrees of adjustment for a personalized and more accessible reading experience.
- Pause Animations: Pauses content that moves or auto-updates that is considered an accessibility barrier. Stops animations, blinking, and flashing content, assisting those with cognitive or sensory issues who may find animated elements distracting or overwhelming.
- Hide Images: Hides images on a webpage to cater to users who may have slow internet connections, prefer a faster browsing experience, or have visual impairments that make images irrelevant.
- Dyslexia Friendly: Utilizes fonts specifically designed to enhance readability for individuals with dyslexia, incorporating features like increased letter spacing and distinct letterforms. There are two options to choose from:
- Dyslexia Friendly: Enhances readability for those with dyslexia and provides a more effortless and more fluid reading experience tailored to site visitors with dyslexia.
- Legible Fonts: Converts stylized fonts into accessible fonts and font weights essential for visually impaired and dyslexic users who find nonstandard fonts confusing or challenging to read.
- Cursor: Adjusts the cursor on the screen, aiding users with visual impairments or motor control difficulties in accurately interacting with on-screen elements. Below are three cursor adjustments available in this feature:
- Big Cursor: Increases the standard cursor size by 400% to ensure the pointer remains in sight. Allows faster and more accessible navigation through hyperlinks, tabs, and form elements.
- Reading Mask: Creates a customizable overlay highlighting specific lines or text sections, assisting users with visual tracking difficulties or dyslexia.
- Reading Guide: Converts the cursor into a high-contrast horizontal reading guide on the screen. Focuses and guides the eyes to reduce eye strain for users who are visually impaired, dyslexic, cognitively disabled, and users with presbyopia.
- Tooltips: Displays additional information or descriptions when users hover over specific elements, supporting users with visual impairments or those seeking more context about on-screen content.
- Line Height: Adjusts the spacing between lines of text, enhancing readability and making it easier for users with visual impairments or reading difficulties to follow the text.
- Text Align: Modifies the alignment of text (left, center, right), allowing users to customize the presentation based on personal preferences or readability needs.
- Saturation: Allows to adjust the saturation on a page. A vital accessibility function that helps users with deuteranopia, tritanopia, and other forms of color blindness to better distinguish your site’s content. There are three presets available to choose from Low Saturation, High Saturation, and Desaturate (to completely desaturate all colors on the page).
What Is Included in the Paid AI Accessibility Widget App?

The paid plans get access to all the free functionalities above, plus:
- Accessibility Profiles: Customizable user profiles allow individuals to save and apply specific accessibility settings based on their needs. Users can personalize preferences such as text size, color contrast, and navigation options for a more tailored experience.
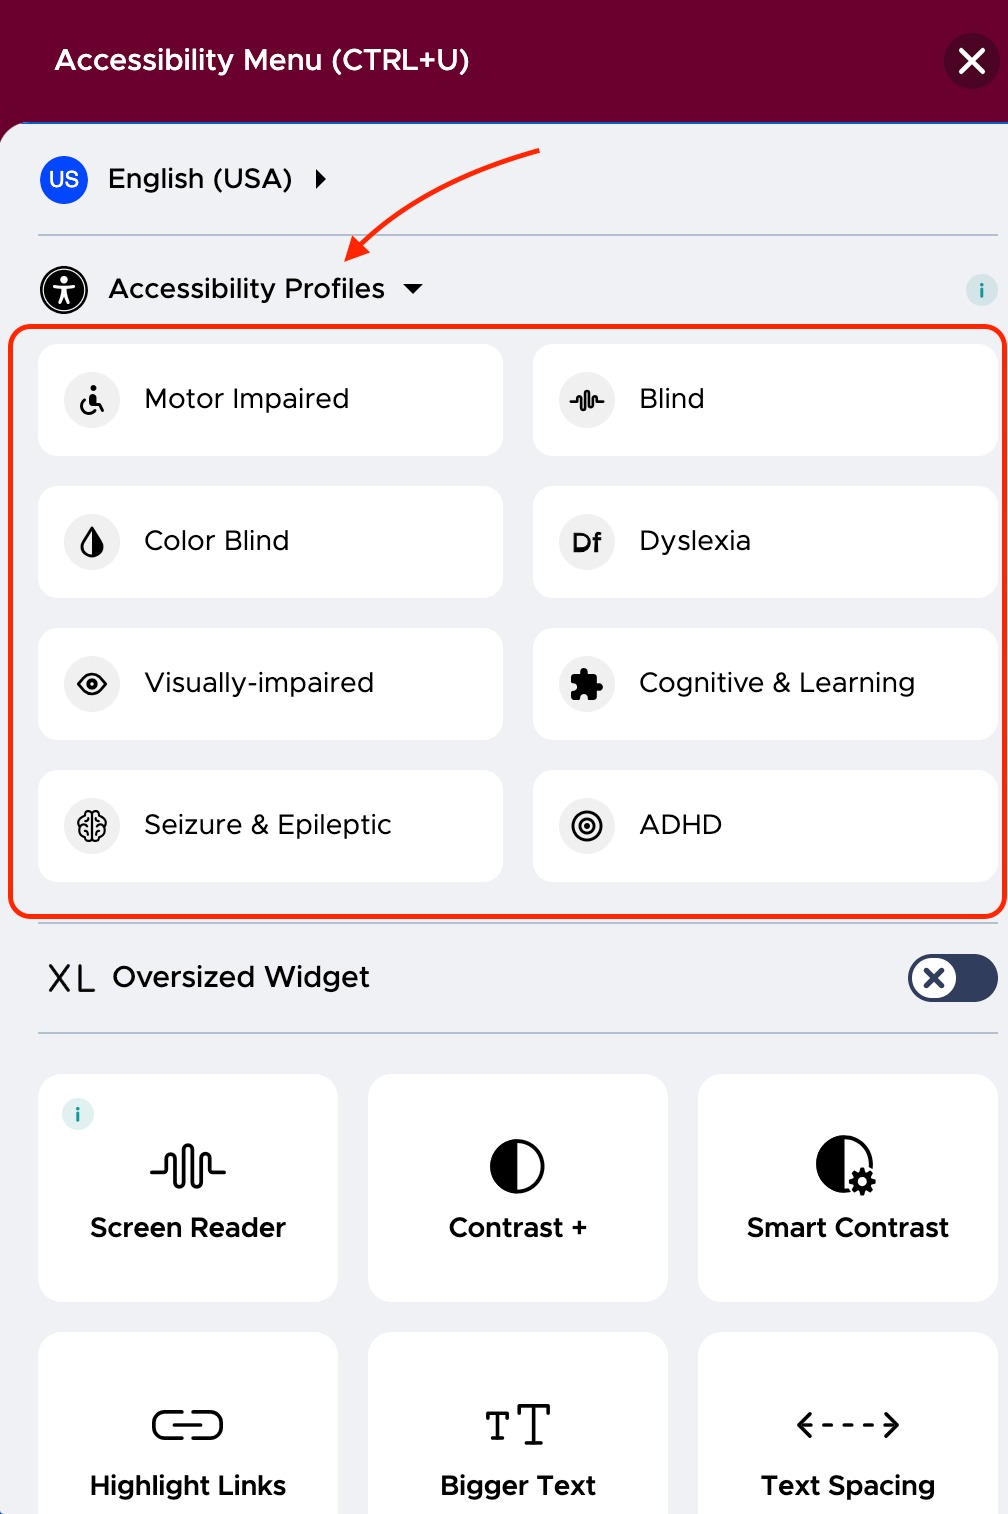
- Screen Reader: The widget’s industry-leading screen reader reads all page content aloud without installing an external screen reader.
- Smart Contrast: The "Smart Contrast" feature will ensure all your site colors are fully ADA compliant, allowing you to confirm your site colors meet WCAG 2.1 AA or even AAA.
- Page Structure: Quickly reveals page headings, landmarks, and links in a clear, structured, easily navigable, and accessible manner. Helps both disabled and non-disabled users find the content they want faster.
- Dictionary: Gives users access to dictionary lookups without leaving the website. Essential for those with cognitive disabilities, non-native English speakers, and more.
- AI-Powered Accessibility Remediations: Utilize artificial intelligence to identify and fix accessibility issues on a website automatically. This proactive approach helps website owners and developers address potential barriers for disabled users, ensuring compliance with accessibility standards and regulations.
You’ll find more information about the automatic AI-powered remediations that run in the background in the Full Widget Capabilities section below.
Full Widget Capabilities
The full AI-powered Accessibility Widget that comes with paid plans enables all of the features and functions, back-end and front-end logic, and remediation layers to accelerate ADA and WCAG compliance.
This means that in addition to what the user sees on the user interface, 100+ AI-powered accessibility tools are running in the widget's background.
- Keyboard Navigation: This enables users to navigate web pages using only a keyboard. Helps mobility- and visually-impaired users quickly move through website pages to access the information they need without using a mouse or pointer device.
- Image Alts: AI- & ML-powered image recognition automatically provides high-accuracy image alts & descriptions of non-text content for users relying on screen readers. Site admins can approve or modify alt text to ensure it accurately reflects each remediated element.
- Form Labels: This creates essential form field labels, “required/mandatory” attributes, and more for screen readers to communicate the intention and expected value by the user for each interactive form field.
- Headings: Ensures an accessible heading structure (hierarchical, sequential) for each page on your site. Essential for users relying on keyboard navigation, accessible hotkeys, and screen readers.
- Form Validation: Notifies users of any errors encountered during form submissions. Provides contextual info for each field that requires a correction to ensure a successful form submission.
- Interactive Elements: Automatically remediates any non-interactive elements with mouse or keyboard handlers by ensuring they are fully focusable and accessible with keyboard navigation and other assistive technologies.
- Autoplay Videos: Gives users play/pause control over videos on the page. Allows site visitors to choose when content plays to prevent distractions and reduce any triggers that may cause seizures or epileptic events.
- External Link Targets: Opening new tabs or windows without warning can disorient blind users, particularly those relying on screen readers or other assistive technologies. Such links are automatically remediated with a clear announcement to the user.
- Ambiguous Links: Updates ambiguous anchor texts to ensure the purpose of the link is conveyed. Disambiguates links such as “click here,” “download,” and “read more” by automatically adding context for readers relying on screen readers.
- Broken Links: Automatically remediates any broken links that don't point to live sources. Broken links diminish the user experience for all users but especially for blind users and for users with low vision, mobility impairment, or cognitive disabilities.
- Missing Titles: Creates required element titles when they are missing or unclear. Helps users and assistive technology to understand the page structure and its components.
- Element Focus: Ensures a visual indicator of focus for users who rely on keyboards to navigate and automatically applies remediation if one is missing.
- Site Language: Automatically remediates missing language attributes on each page. This is essential for users who rely on assistive technology like screen readers, braille translators, and voice recognition software.
- Content Moderation: Searches for and alerts site owners to potentially harmful or inappropriate content on their website and suggests alternative language that can be approved, rejected, or altered.
- Accessible Pricing: Ensures that prices on your site are fully accessible to assistive technologies. Critical for ecommerce stores.
Behind-the-scenes Code Fixing
The Widget uses two types of technology for behind-the-scenes code fixing:
- ART: Automated remediation technology
- BBATs: Browser-based assistive tools
UserWay's Automated Remediation Technology
In the background, ART uses JavaScript code that finds accessibility errors or issues when a page loads. It then applies fixes for any violations it can on the spot. Automated remediation helps companies move the needle significantly with their accessibility.
Browser-based assistive tools
For the web user, personalization tools adjust the web interface and adapt it to individual needs. For example, font sizes, dyslexia-friendly font, and color contrast changes – all contribute to usability.
How To Set Up the AI Accessibility Widget
To get the AI Accessibility Widget live on your site, all you need is the URL of the website you would like to place the widget on. You’ll need to know roughly how much traffic that site gets per month to select the appropriate plan tier.
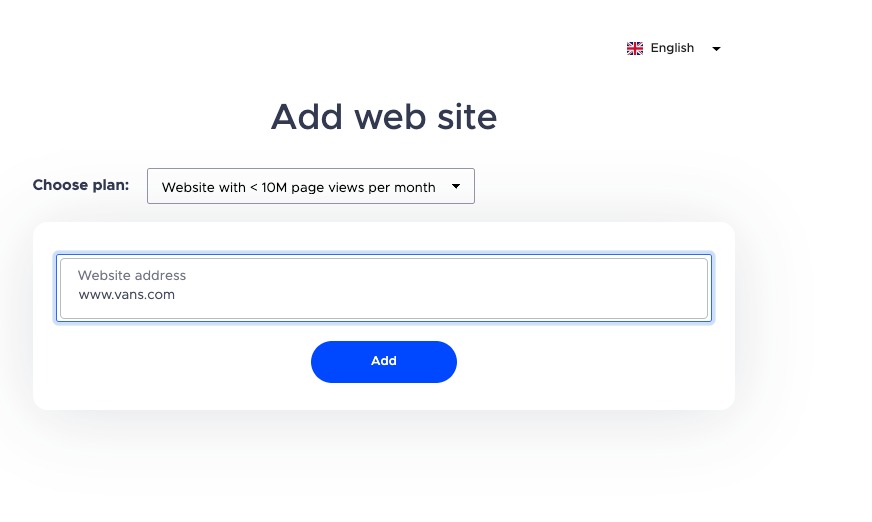
Once you have input your website URL and selected your plan tier, hit “Add.”
You’ll be taken to the widget customization page. This is also where the app will generate the line of code you will embed in your website’s <head> tag. 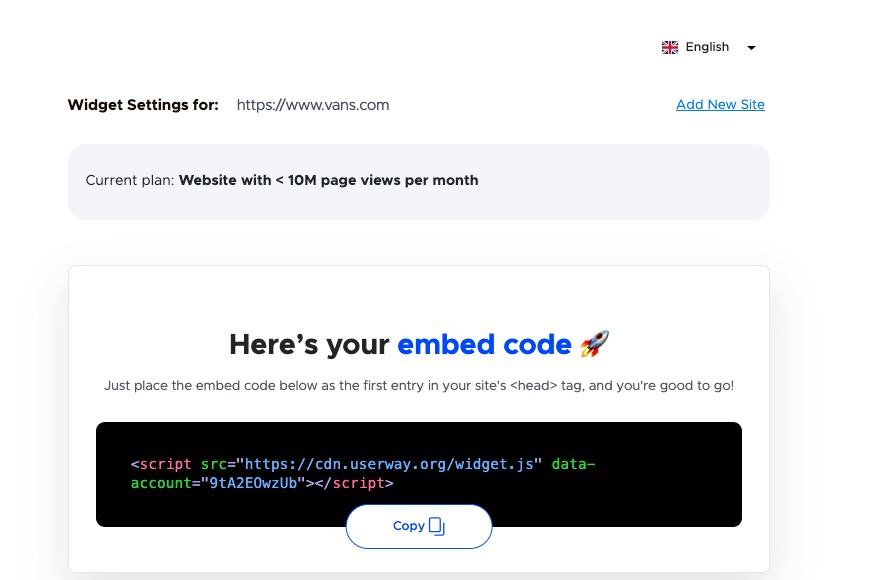
From there, you can make customizations to the widget’s appearance.
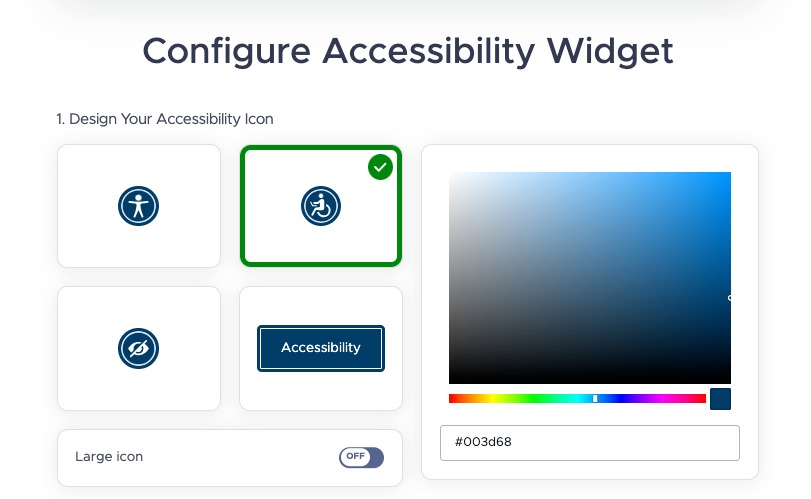
Select one of the four icon options and choose your ideal color from the color spectrum/scale. You can input the color number if you have a specific color in mind.
If you want a large icon, simply toggle the “Off” button.
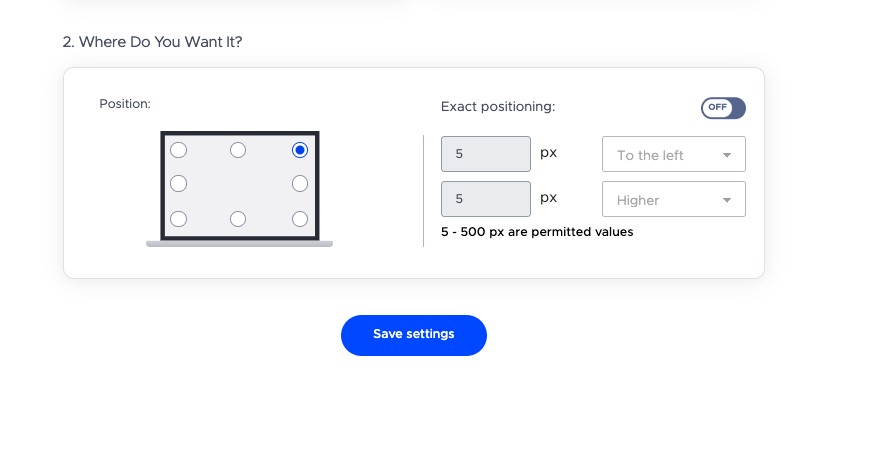
Finally, you can choose the orientation of the widget, either by clicking one of the dots on the computer icon or by toggling on “Exact positioning” and giving the pixel dimensions.
Once you have customized the widget, click “Save settings.”
Scroll back up to the top of the screen and copy the line of code in the black box. Put that line of code into your website <header> tag, and AI Accessibility Widget will do the rest on the backend so you don’t have to worry about complex coding issues.
The next time you want to add a site, click “Add New Site” at the top, right-hand side of the screen.

WordPress Integration
You can integrate your AI Accessibility Widget with WordPress. Here’s how to do that:
Step 1: Generate the code within the app
As covered above, you are going to input your URL and customize your widget, and the code will be generated automatically into the black box (see image above).
Step 2: Copy the embed code
This step is simple: Click the “Copy” button in the black box with the code, which will copy the code to your computer’s clipboard. Once you have done that, head over to your WordPress site.
Step 3: Embed your code into WordPress
Note: This step requires some familiarity with code, as you must add your unique code to the HTML in your WordPress site. Please be sure not to delete anything from your website’s existing code, as it can negatively impact your website.
In your WordPress dashboard’s left menu, scroll to “Appearance” and select “Theme File Editor.”
On the right side of the page, under “Theme Files,” scroll down and select “footer.php” to open it.
Next, scroll back down to find the body closing tag that looks like “</body>” and place your cursor above it; click “Enter” on your keyboard several times to give yourself some space.
Right-click with your cursor on one of the new blank lines and select “Paste” to insert the script.
Don’t forget to update your website by clicking on “Update File” under the code.
Interacting With the Live Widget on Your Site
Once you’ve installed the embedded text into your site header tag or you’ve installed the WordPress widget, your users can start customizing their accessibility right away.
To ensure it works, navigate to your site and look for the widget icon you selected during setup. Once you see it, click on it.
Note: Below is a screenshot of the paid version of the widget.

A pop-up Accessibility Menu will appear with the tools accessible to you/your site visitor in the user interface. Remember, this will look different depending on the plan you choose.
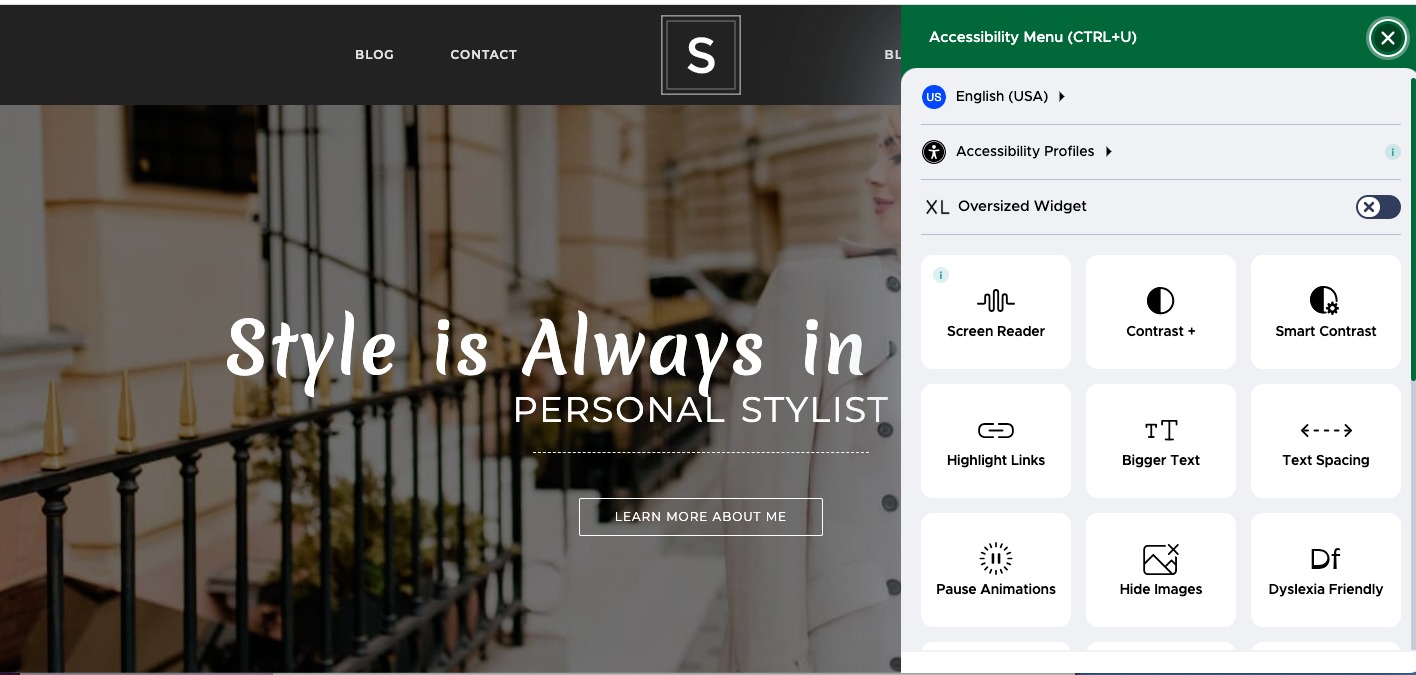
Once the menu is pulled up, users can select their language in the first dropdown menu.
In the second dropdown, you can choose from a set of premade accessibility profiles. You can also toggle on “Oversized Widget” mode to make the AI Accessibility Widget appear in larger print.
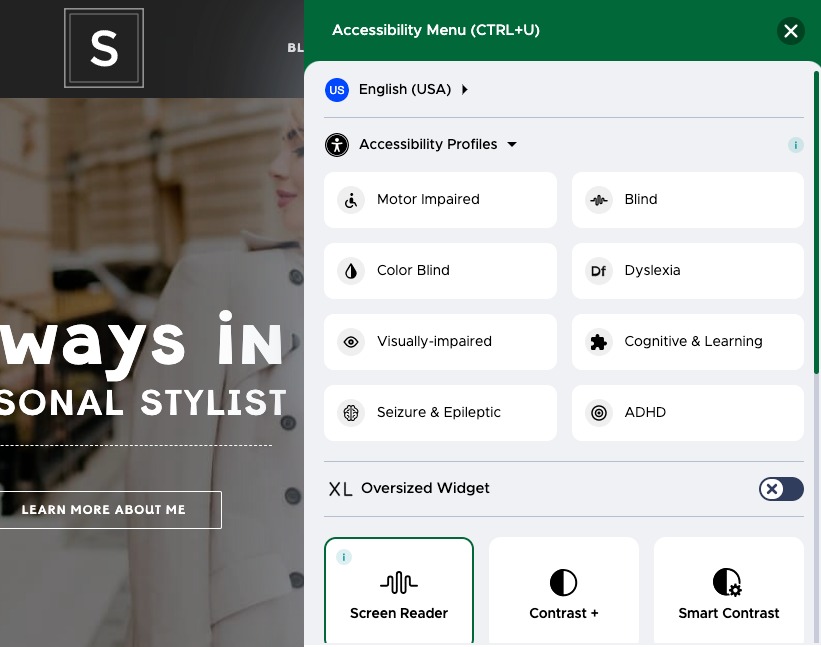
You can also customize individual tool settings by clicking on the icon for that tool.
For example, clicking “Screen Reader” will allow you to adjust the screen reader volume to one of several levels.
If you need to reset your adjustments, that can be done by hitting the “Reset All Accessibility Settings” button at the bottom of the page.

Frequently Asked Questions
Customers must choose their AI Accessibility Widget package based on their monthly page views.
Each widget in AI Accessibility Widget applies to a single site. Users can use the "add new site" button to add the widget to multiple sites. There's no limit to the number of sites that can be added.
Your AI Accessibility Widget will work as soon as it is installed. Once you’ve completed the steps for one of the installation options above, check your website to ensure your widget shows up correctly.