What Is a UTM Code?
An Urchin Tracking Module (UTM) code is a snippet of text added to the end of a URL on your website. To help you track your digital marketing campaigns and gauge their performance.
It can look like this:

When a UTM-coded link is clicked, it sends data to your site’s analytics software (like Google Analytics). So you can see how users who clicked the link behaved. Like whether they completed a conversion.
Once you have this information, you can analyze it to inform how you’ll optimize your marketing strategies.
Why Should You Use UTM Codes?
UTM codes help you:
Track Referral Traffic
Using UTM code makes it easier to track where your traffic comes from. So you know which campaigns are driving clicks.
And it’s particularly useful for tracking email campaigns. Because email is one of the few traffic sources web analytics can’t accurately track.
UTM codes also help you track referral traffic at a micro level.
For example, say you want to create a series of Facebook posts.
Without UTM codes, you’d likely see a report like this in your analytics:

This report shows you the total traffic from Facebook. But it doesn't tell you which Facebook posts brought the traffic.
UTM codes can give you that level of insight. So you can see things like which exact posts/campaigns drive traffic.
Like this:

Understand User Behavior and Customer Journeys
Adding UTM codes to your URLs lets you effectively segment your audience to track how different groups of users interact with your site. And how those users eventually turn into customers (also known as the customer journey).
Say you notice that traffic from email campaigns converts 25% higher than traffic from social media campaigns.
Knowing this, you might want to encourage your social media followers to sign up to your email list. Where you can nurture them to become buyers.
To dig even deeper into customer journey information you can use to improve performance, try ImpactHero.
Start a free trial by entering your domain and clicking “Start your trial.”

Add the tracking code to your website. (Our tracking code installation guide can help if you get stuck.)
Click “Complete campaign setup ” after adding the tracking code.

Allow ImpactHero a day to start collecting data.
Once it’s ready, start evaluating how your content is performing at different stages.
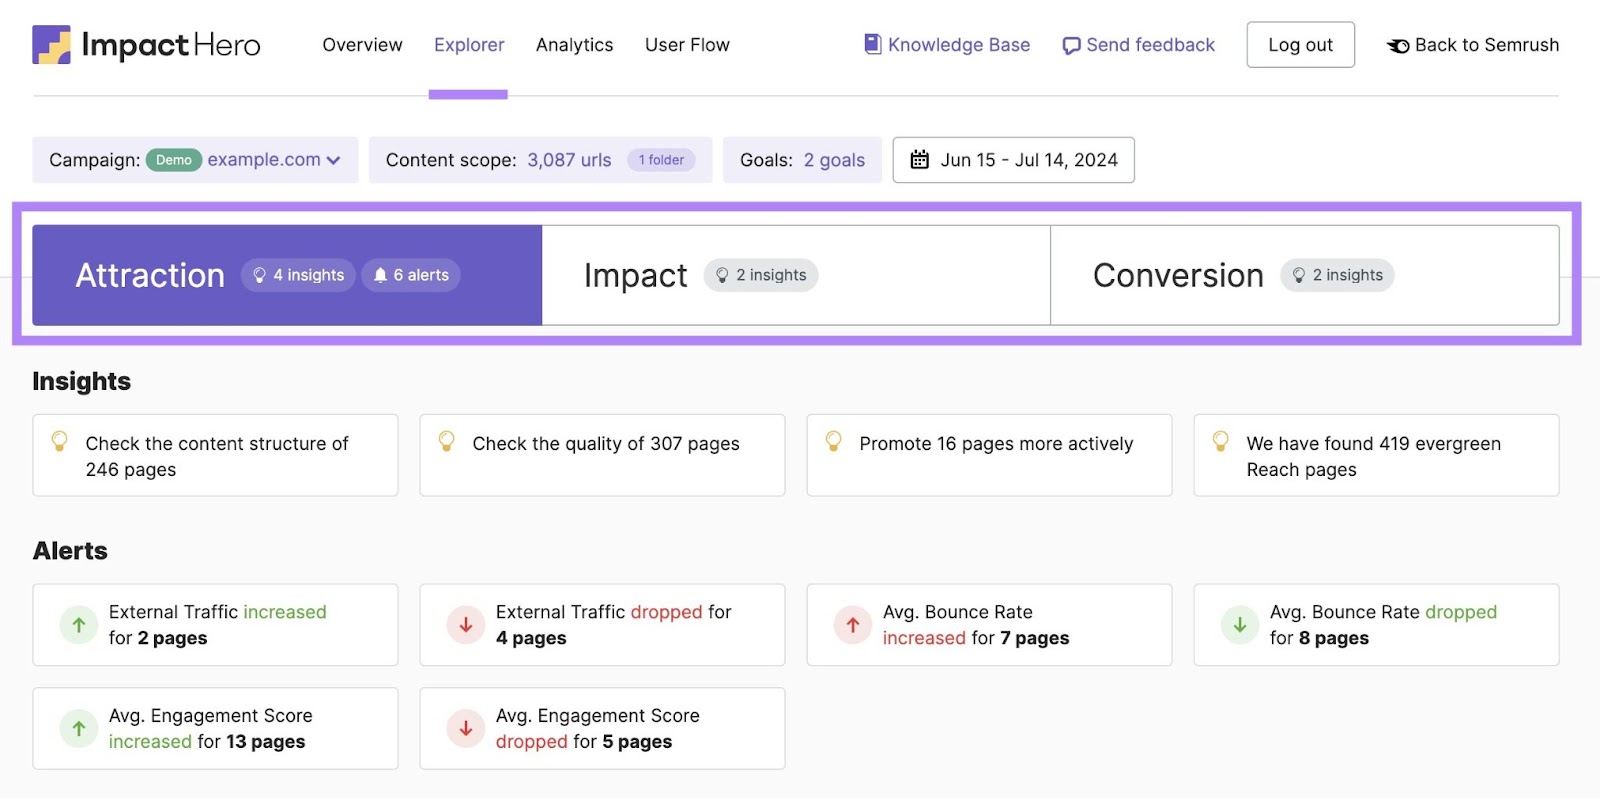
The “Explorer” report tells you which pages do the best job at attracting visitors (“Attraction” tab), nurturing them (“Impact” tab), and converting them to leads (“Conversion” tab).
Enhanced Attribution
UTM codes help you tie a dollar figure back to your marketing campaigns. Because you’ll know exactly which campaigns and posts are driving conversions.
Say you decide to run several organic social media campaigns advertising products.
With UTM codes, you can see how each campaign performed. Which can help you plan future campaign messaging, forecast your potential return on investment (ROI), and allocate your marketing budget more appropriately.
Perform A/B Tests
A/B tests involve testing two versions of some sort of content against one another. Which can be an effective way of learning about your audience and understanding what motivates them to buy.
Some examples of A/B tests you can perform with UTM codes include:
- Ad copy: Test different messaging in your ads and see which one drives the most conversions
- Calls to action (CTAs): Create CTAs that vary in directions to determine which one results in the most clicks
- Offer types: Test the way you position your offer (i.e., a dollar discount versus a percentage off) to see which one people prefer
- Visual content: Add hyperlinks to product images in your emails and figure out which one drives the most traffic
What Are UTM Parameters?
UTM parameters are the different text snippets that make up an entire UTM code. To convey information about where the link is placed, which campaign it’s a part of, etc.
Each parameter identifies a different aspect of the campaign it’s associated with. And is separated by an ampersand (&).
You can see three distinct UTM parameters in the example below, beginning with “utm_source”:

And there are five standardized UTM parameters that you can typically use for your web analytics:
UTM Source Parameter
The source parameter defines the source sending the traffic. Examples of values you might use are “google” (for ads), “facebook” (for social media posts), or “monthly_newsletter” (for an email marketing campaign).
Below, this parameter is used to differentiate the components of an email campaign. So, it uses “utm_source=weekly_sale” to track a weekly sale email.
Like this:

And if you want to track traffic from your weekly newsletter, you could use something like “utm_source=weekly_newsletter.”

UTM Medium Parameter
The medium parameter defines the type of traffic. Like “organic” (unpaid search), “banner” ( a type of paid ad), or “email.”
For a weekly sale campaign, the UTM parameter could look like this:

The purpose of the medium parameter is to group one medium together. To monitor the entire medium’s performance at a high level. And use it as a benchmark.
For example, say your email traffic usually converts at a rate of 8%. But you notice a specific campaign converts at only 2%. (We’ll discuss the campaign parameter next.)
Knowing your benchmarks helps you spot specific campaigns that underperform (or perform great). So you can dig into them to improve future campaigns.
UTM Campaign Parameter
The campaign parameter sets the name of the specific marketing campaign. Like “fall_sale” or “product_launch”.
A weekly sales email might use the date as the campaign identifier:
For example:

With this parameter you can drill down into each campaign’s performance.
For example, say this is a weekly sale.
Compare it to past campaigns to see whether it performed better or worse. Then, try to understand why by looking at what could have impacted this campaign. Like different copy or product images.
UTM Content Parameter
The content parameter is useful when you have several links pointing to the same landing page and you want to know which link people clicked to land there.
For example, say you’re running an influencer marketing campaign with multiple influencers. You can use each influencer’s name in the corresponding content parameter to know who sends the traffic.
Or use content parameters to run A/B tests.
For an email campaign, you could see which image results in more revenue: product shots or lifestyle shots.
To do this, you would send half of the audience an email featuring product images. But an email featuring lifestyle images to the other half.
And use “utm_content=product_shots” and “utm_content=lifestyle_shots” to differentiate between the two versions:


UTM Term Parameter
The term parameter sets the specific keyword or phrases that sent visitors—usually only for paid search ads. And you likely wouldn’t use it for something like an email campaign.
Take this example URL for a Google Ad.

The UTM term parameter is “utm_term=website_ heatmap_ tool.” Because “website heatmap tool” was likely a keyword used for the campaign.
With term parameters, you can compare how different keywords perform for your search campaigns.
How to Create & Use UTM Codes for Google Analytics
Let’s go over the main steps involved in creating and using UTM codes in GA4:
Generate UTM Codes
You can manually create UTM-coded URLs or use dedicated tools like the UTM feature in Social Poster (part of Semrush Social).
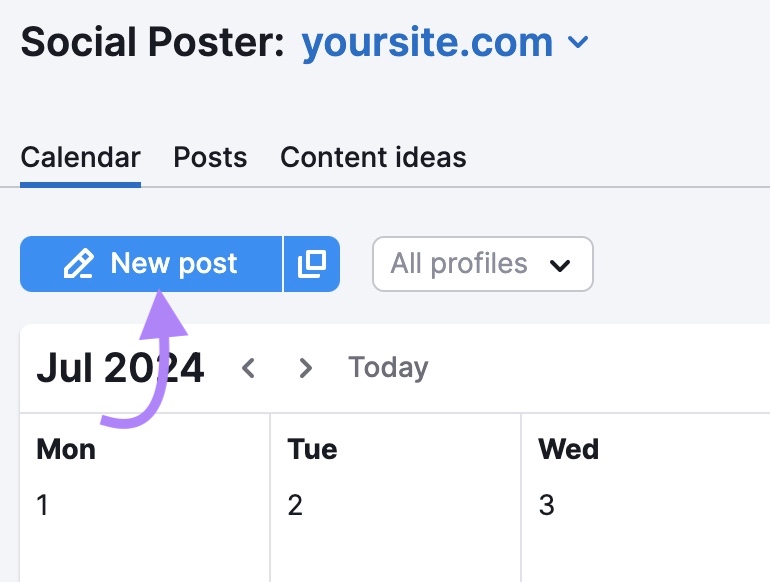
Open Social Poster and connect your social media accounts. Then click “New post.”
Draft your post and click “UTM” to set the UTM parameters for your post’s link. And click “Apply to post.”

Social Poster automatically adds the UTM parameters to your post. So you can track traffic from different campaigns, mediums, and sources.

This is what the link from the above example looks like:

If you’re creating UTM codes to use in other locations, try Google’s Campaign URL Builder.
Let’s look at how to use it to generate the below URL:

First, go to the Campaign URL Builder tool.
Make sure the toggle is set to “GA4.”

You’ll see the available fields to fill out. (Three are required, as indicated by asterisks: “website URL,” “campaign source,” and “campaign medium.”)
In most situations, you’ll want to use the campaign name parameter as well.

Fill out the “website URL” field. This is the page you want visitors to land on when they click your UTM-coded link.

Next, fill out the campaign source.
This is a promotional email, so you’ll enter “promotional_email.”

Now, enter the campaign medium.

And enter the campaign name.

The URL builder tool automatically generates the UTM-coded link once you fill out the fields.
This is what your URL will look like with the selected UTM parameters.
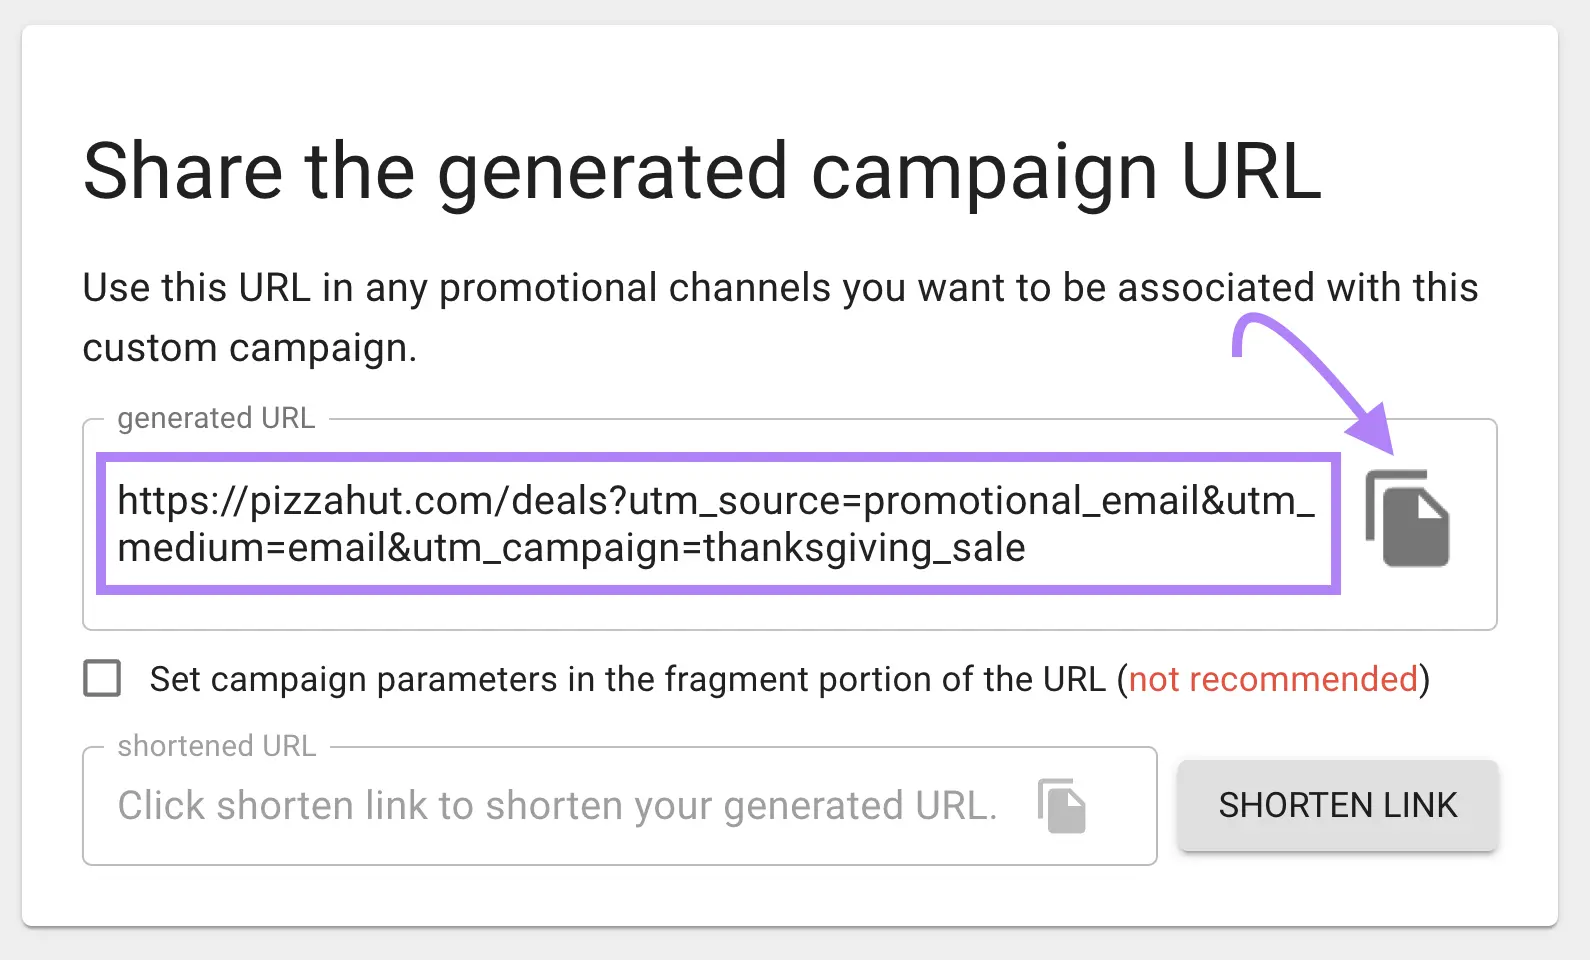
You can copy the URL with the icon to the right and use it in your promotional email.
Or use the built-in URL shortener tool to clean up your URL.

This is useful if you’re using the link in a place where it will be visible.
Then, when your audience clicks either the full link or the shortened link, the UTM parameters will be passed to Google Analytics. So you can analyze your link’s performance.
Test UTM Codes
After creating a UTM code, you’ll want to test it to make sure it works using the “Realtime” report in GA4.
Just know you need to clear your cookies first if you aren't visiting your site for the first time.
This is because the report is based on user-scoped dimensions. Meaning you're still considered a single user even if you leave and then come back.
Only after you clear your cookies will you be seen as a new user. And able to test your UTM code.
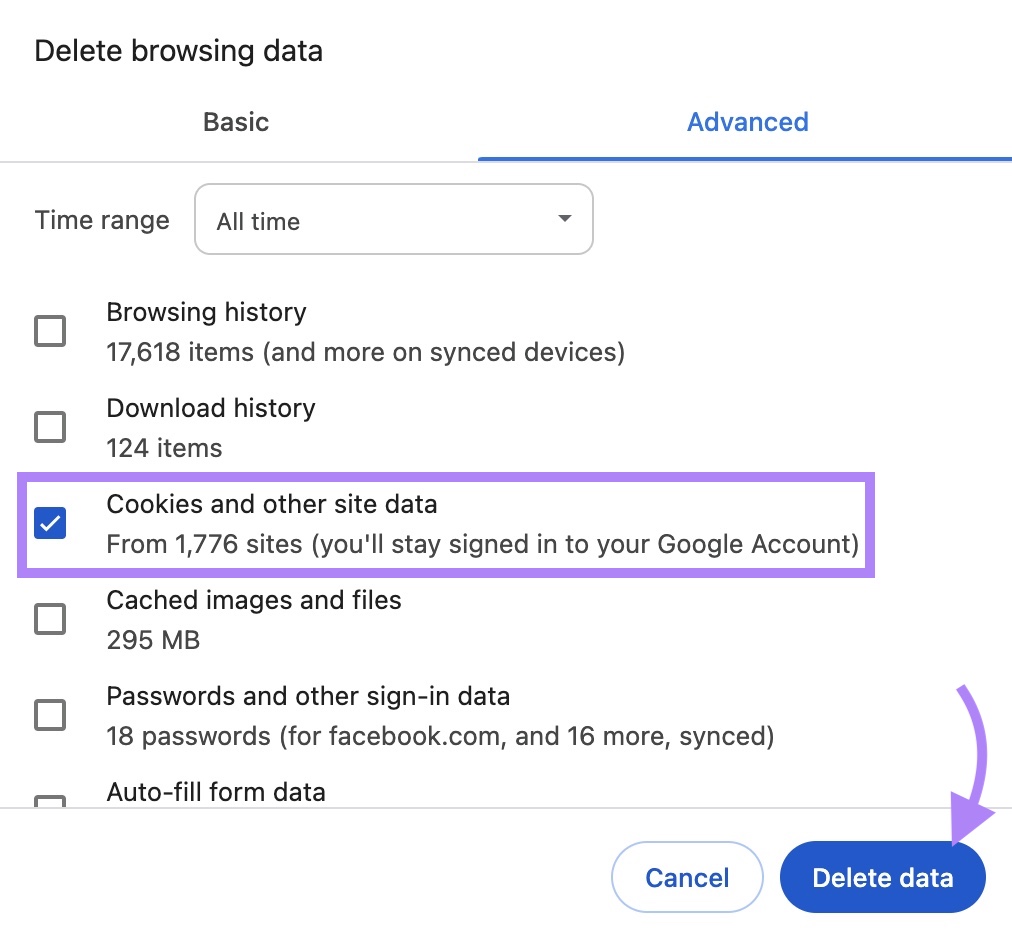
To do this, click the three-dot icon in the top right corner of your browser and click “Delete browsing data…”

You’ll see a menu where you can choose which browsing data to delete. Select “Cookies and other site data” and click “Delete data.”
Now, paste the UTM-coded URL into your browser and visit the page.
Next, open GA4 in another browser window and click “Reports.”

Now, click “Real-time.”
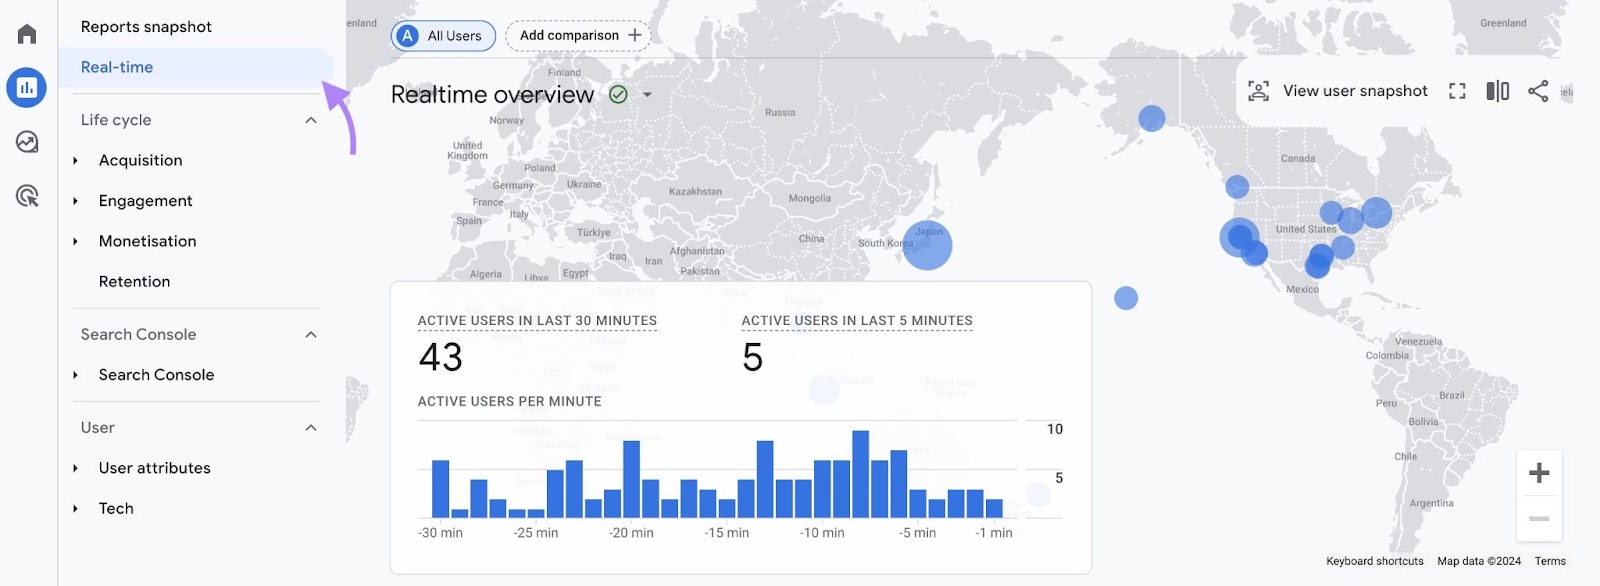
Look for the card that shows “Users by First user source.” And click the drop-down arrow.
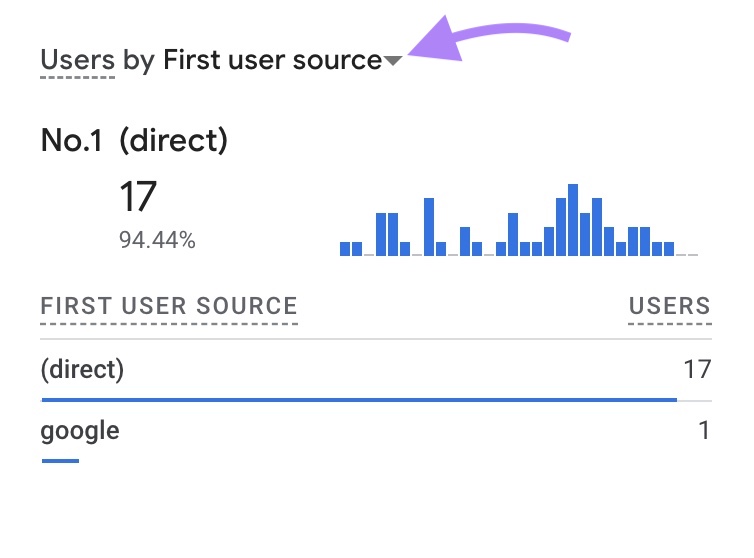
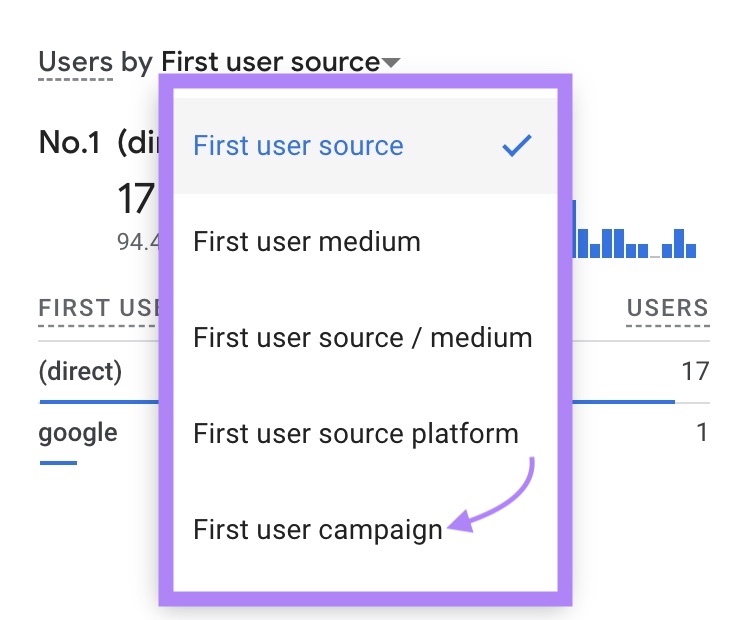
Change the dimension to “First user campaign.”
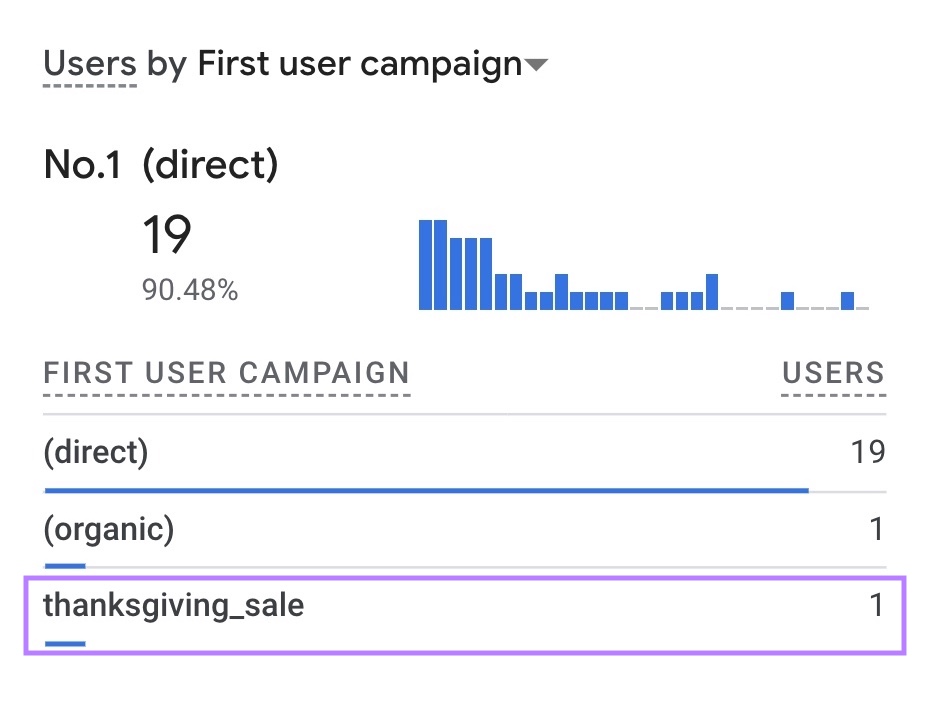
If you’ve set up your campaign parameter correctly, you should see your campaign name here. If you’re the only person testing, you should see a value of “1” in the “Users” column.
For example, if you used “utm_campaign=thanksgiving_sale,” you should see this:
If you don’t see the name of your campaign after several minutes, double-check the construction of your UTM-coded link in your browser. And make sure that nothing was accidentally changed after copying it from the tool used to create it.
View UTM Code Tracking Data
The “Traffic acquisition” report is the best place to see your UTM-tagged traffic in GA4. Here’s how to do that.
After you’ve logged in to GA4, click “Reports.”
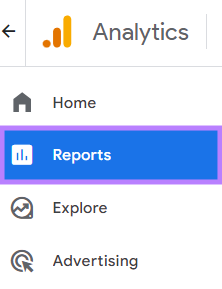
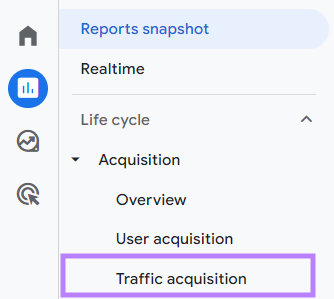
In the “Life cycle” menu, click “Acquisition” > “Traffic acquisition.”
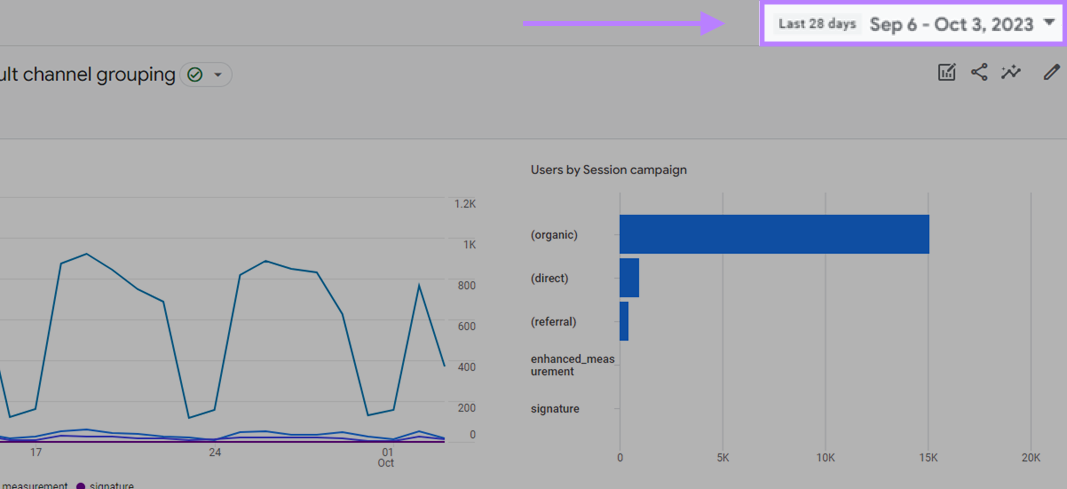
You’ll see a report that shows the last 28 days’ worth of data by default. But you can customize the date range by clicking the date field in the top right corner and then choosing the time period you want to evaluate.
The “Traffic acquisition” report shows your site’s traffic grouped at the channel level. But you can change that by clicking the small black arrow as shown below.

Then, select “Session campaign” from the list of available dimensions.
This will change the primary dimension to show all the traffic you’ve tagged using the “utm_campaign” parameter:
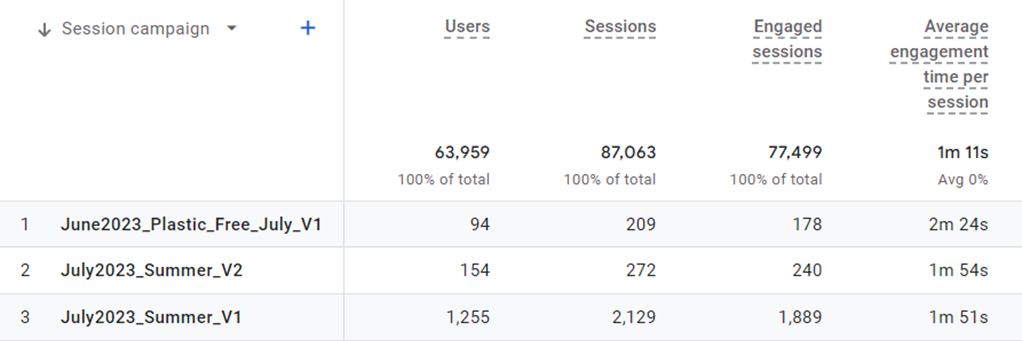
Now, click the blue “+” sign to the right of “Session campaign” to add a secondary dimension to your analysis.
You’ll be able to search for a secondary dimension to add to your campaign data. Begin typing “session source / medium” in the search field and click on it.
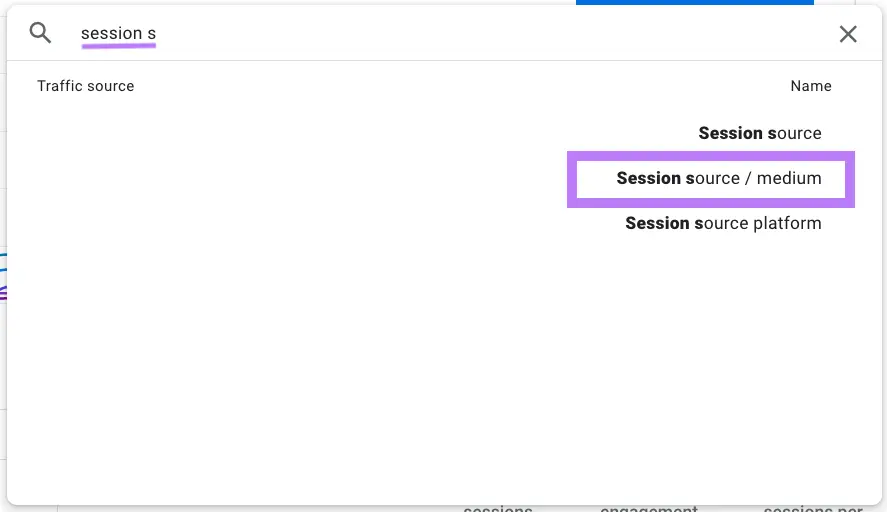
This will show the details for both the “utm_source” and “utm_medium” parameters.
Here’s what the report looks like now:

You can only view two dimensions simultaneously in GA4 standard reports. You’ll need to add filters to view more dimensions.
Here’s how:
Apply a filter by clicking “Add filter” at the top left of the report.

On the right side of your screen, you can now create your filter conditions.
Begin typing “session medium” in the “Dimension” field. Then click “Session medium” once you see it.
To create a filter to view your email traffic, select “exactly matches” below “Match Type.”
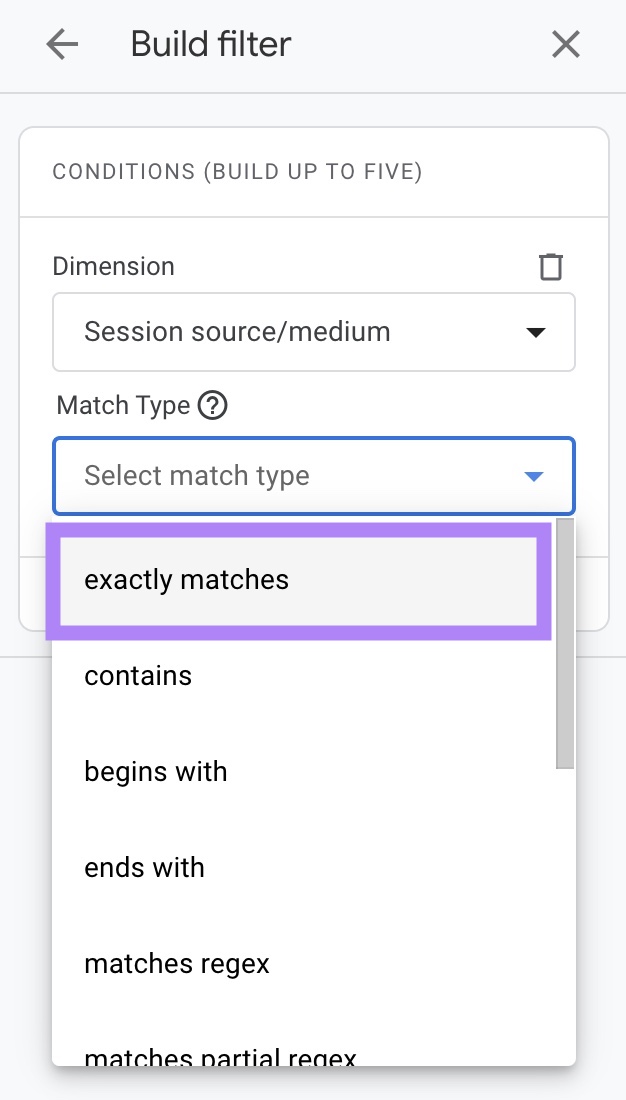
Then, click into the field below “Value” and check the box next to “email”:

Finally, click the “Apply” button at the bottom.

You now have a filtered report of only your email traffic.
UTM Code Best Practices
To successfully and accurately track your campaigns, you must keep your data clean and orderly.
Stick to these guidelines, and your UTM data will be easier to manage.
Keep Track of Your UTM codes
Keep track of the UTM codes you use in a shared spreadsheet everyone on your team can access.
Google Sheets works well for this.
Whenever someone in your organization creates a UTM code, they can enter it in the spreadsheet to ensure the naming conventions are followed. And that codes aren’t duplicated.
Use Lowercase Letters
UTM codes are case-sensitive. Meaning that analytics tools will treat “email” and “Email” as two separate values.
So, stick with lowercase letters for your UTM codes to keep your parameters consistent.
Avoid UTM Codes for Internal Links
Internal links are links that point from one page on your site to another page on your site. And using UTM-coded links as internal links can skew your analytics.
That’s because Google Analytics will restart a user’s session (the activities and actions users do on your site) when they click a UTM-coded link.
If this happens, you won’t get the full picture of what someone did on your site during their session.
So, avoid UTM-coded URLs for internal links.
Use Short and Descriptive Identifiers
Concise and descriptive UTM codes make it easier to review and analyze your data.
You need enough information to identify what the UTM code is telling you. But you don’t need proper grammar or syntax.
Harness UTM Codes to Drive Marketing Success
You’ll have more actionable data with the additional insight coming from your UTM codes.
And that extra insight gives you a deeper understanding of your customers’ journeys. So you can optimize and improve conversions.
Semrush Social lets you add UTM links to every post so you can easily track all your social media traffic.
Ready to get deeper insight into your campaigns?
Try Semrush Social today.
This post was updated in 2024. Excerpts from the original article by Zack Duncan may remain.