A 301 redirect using an .htaccess file is an HTTP status code that you create when you want to permanently redirect one URL to another.
There are many reasons why you might want to implement a 301 redirect on your site.
But how do you do it? And why should you do it the .htaccess way?
We’ve got answers.
But before we go into specifics, let’s cover the basics first.
What Is a 301 Redirect?
A 301 redirect is a permanent redirect of a URL.
When users try to access an old URL that has been redirected, their browser automatically sends them to the new URL specified in the redirect.
This is useful for users because it ensures a seamless transition when URLs are changed or content is moved, preserving a positive user experience.
And 301 redirects are useful for search engines. Because they help to keep search engine indexes updated.
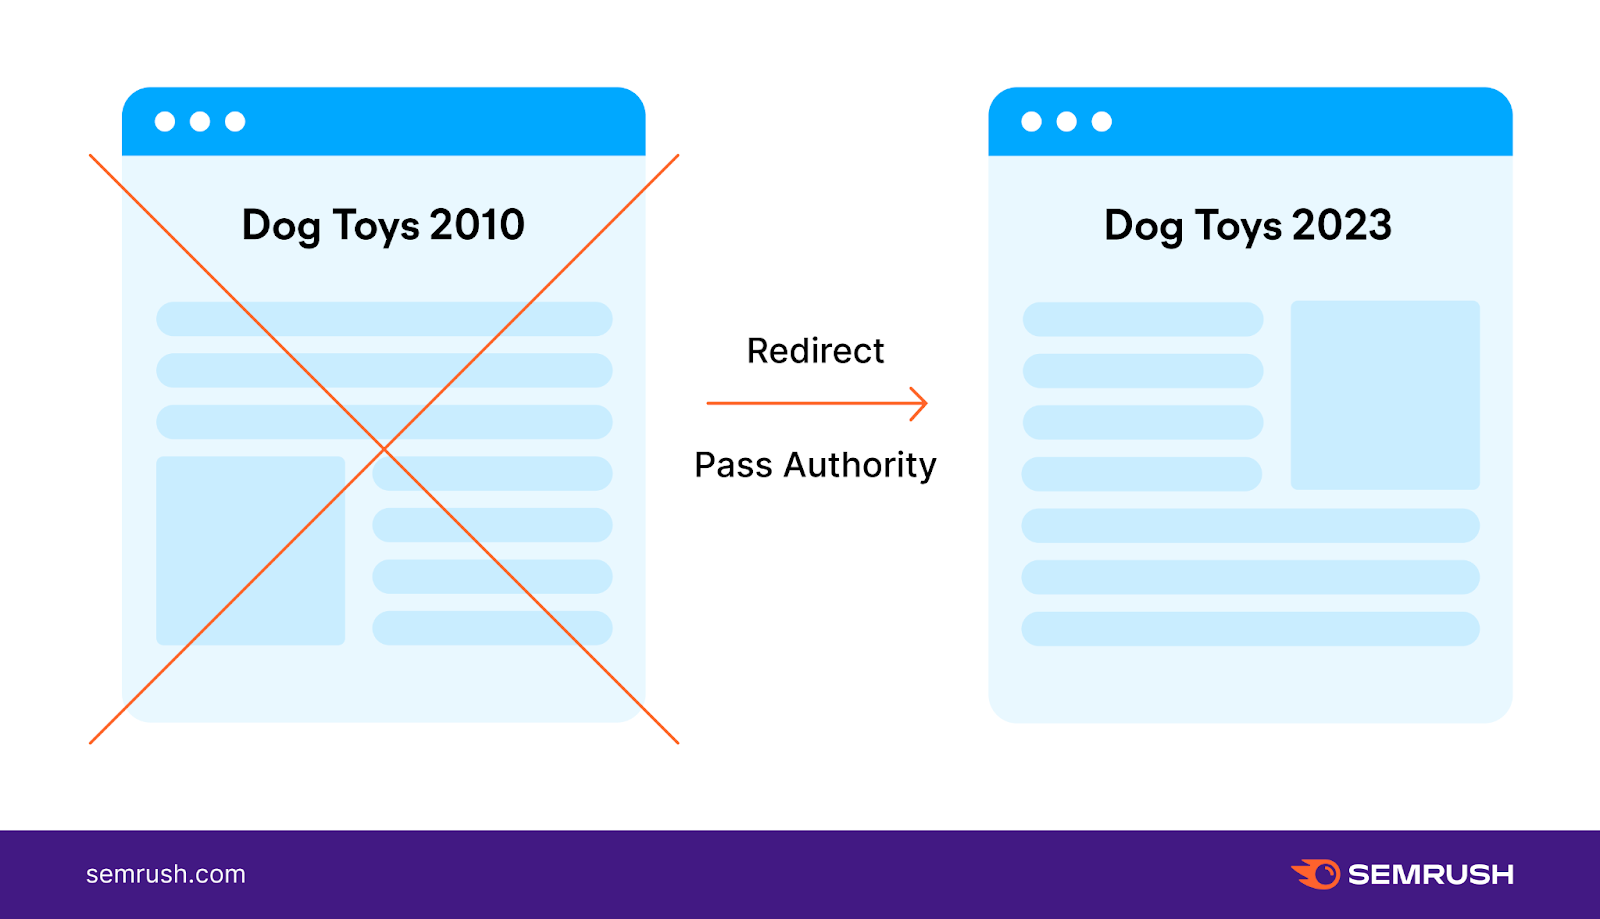
They inform search engines that content has been moved and help ensure that the visibility and authority associated with the old page is transferred to the new URL.
Like this:
For more information, read our full guide to 301 redirects.
What Is an .htaccess File?
An .htaccess file is a text file used to configure different aspects of your website.
You can use it to redirect URLs, modify URL structure, customize error pages, and more.
Using an .htaccess file is a pretty easy way to make important changes to your site.
But you have to be really careful that you’re editing the rules in the file correctly. Because one mistake can cause a lot of problems for users.
When Should You Perform 301 Redirects?
There are many situations when you may want to perform a 301 redirect, such as:
- You changed the URL of a page and want to redirect the old URL to the new one
- You migrated your website to a new domain and want to redirect all the pages from the old domain to the new one
- You switched your website from HTTP to HTTPS and want to redirect all the HTTP requests to HTTPS
- You have duplicate pages that compete for the same keywords and want to consolidate them into one page
- You deleted a page and want to redirect it to another relevant page or the homepage
Using a 301 redirect to make sure traffic from a deleted page ends up on a relevant page minimizes error messages like this:

However, there are different ways of implementing a redirect, such as using server-side code, JavaScript, or an .htaccess file.
Each method has its own advantages and disadvantages, depending on your needs and preferences.
But one of the most common and effective ways of performing a 301 redirect is using .htaccess files.
Using .htaccess files for 301 redirects has some benefits:
- It can handle complex redirection patterns using regular expressions
- It can be used for both individual pages and entire directories
- It works for any type of file or resource on your website
How to Set Up a 301 Redirect with an .htaccess File
A 301 redirect is executed differently depending on the server you use. The .htaccess method is usually used on Apache servers.
How to Set Up 301 Redirects with .htaccess Files in Apache
Before you do anything, you need to locate the RewriteEngine, which allows you to edit rules. You can find it in the mod_rewrite module in Apache.
Load it using the following code:
<IfModule mod_rewrite.c>
RewriteEngine On
</IfModule>
Then you can add all your rules below “RewriteEngine On.” The rules you add will depend on what exactly you want to redirect.
Redirecting a Single URL
When redirecting a single URL, all you have to do is add the following redirect rule under the “RewriteEngine On” line:
Redirect 301 /old-page/ https://www.yourdomain.com/new-page/Make sure you replace URLs with the actual URLs on your site.
The first part of the rule should mention the URL path, starting with a slash. While the second part of the rule should mention the absolute (or full) URL.
If you're an advanced user, you can also use regular expressions for redirecting URLs. The RedirectMatch 301 rule supports regular expressions.
Check out the Apache’s official documentation for more details.
Redirecting a Single Folder
When redirecting a single folder to a new location, you would use the following redirect rule:
RewriteRule ^/?blog/(.\*)$ /news/$1 [R,L]We’ve used “blog” and “news” as an example. In this case, the entire blog subfolder will be redirected to the “news” subfolder.
When implementing this redirect on your site, ensure you use the actual website folder names.
Redirecting WWW to Non-WWW URLs with a 301 .htaccess Redirect
Maybe you want to implement a redirect because you don’t want to use a www subdomain.
If that’s the case, you’ll need to redirect to a non-www version. Here’s the redirect rule you can use:
RewriteCond %{HTTP_HOST} ^www.yourdomain.com [NC]
RewriteRule (.*) https://yourdomain.com/$1 [L,R=301]
Make sure you replace “yourdomain” with your actual domain name.
How to Set Up 301 Redirects with .htaccess Files in WordPress
To do a 301 redirect with .htaccess files in WordPress, you need to follow these steps:
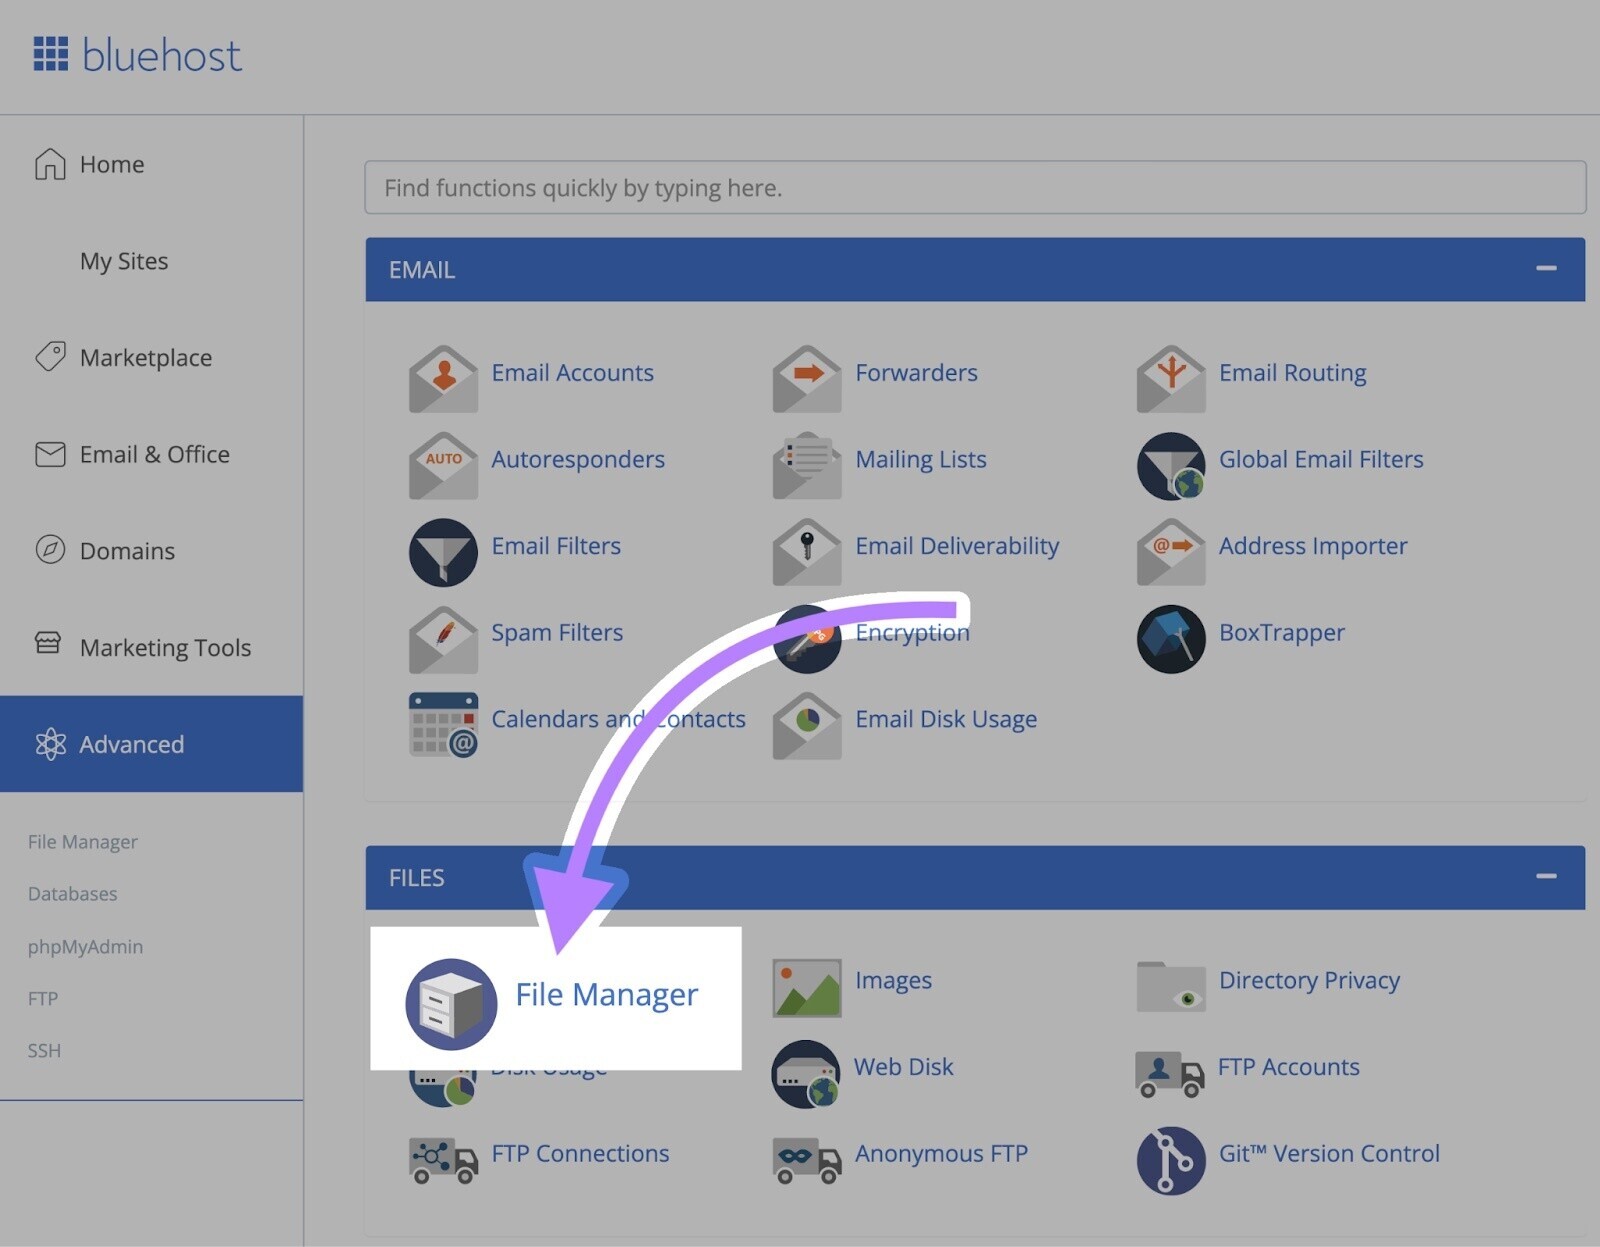
- Access your site files by clicking “File Manager” in your cPanel or FTP client. In this example, we’ll be using Bluehost.
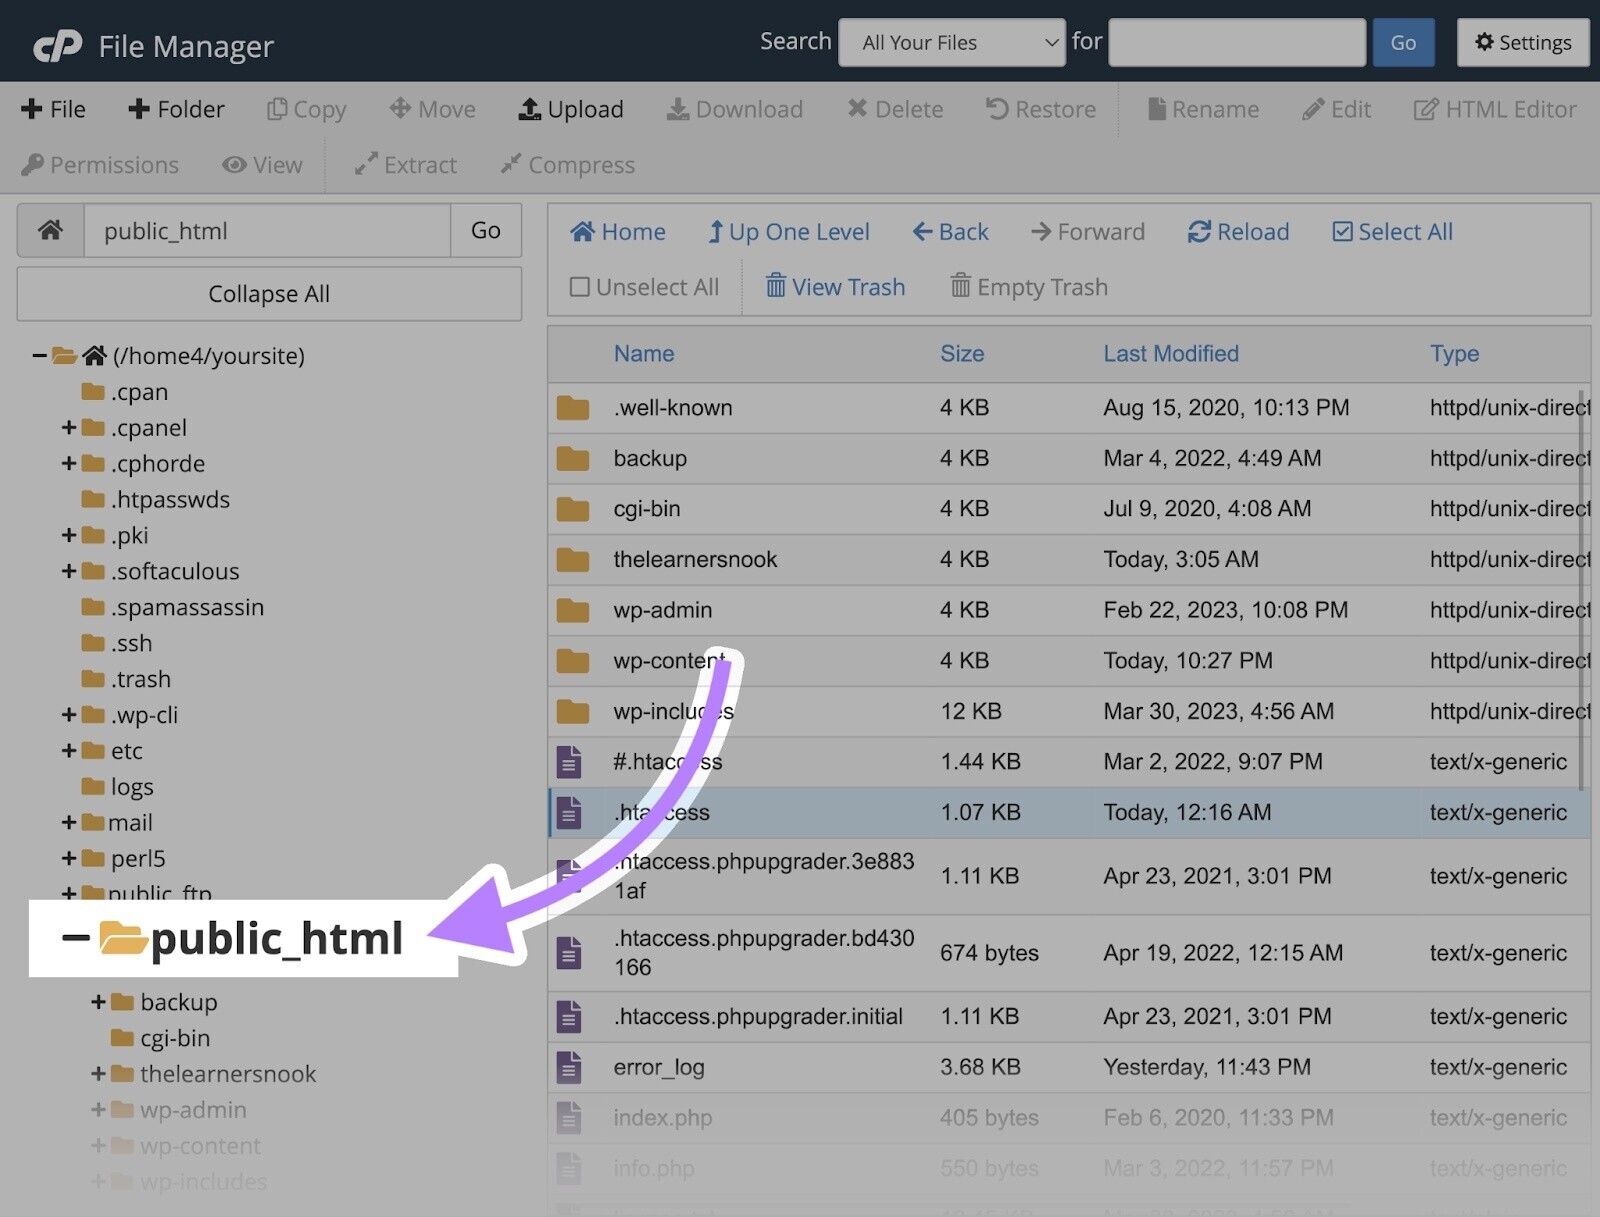
- Look for the .htaccess file in the root folder of your site.
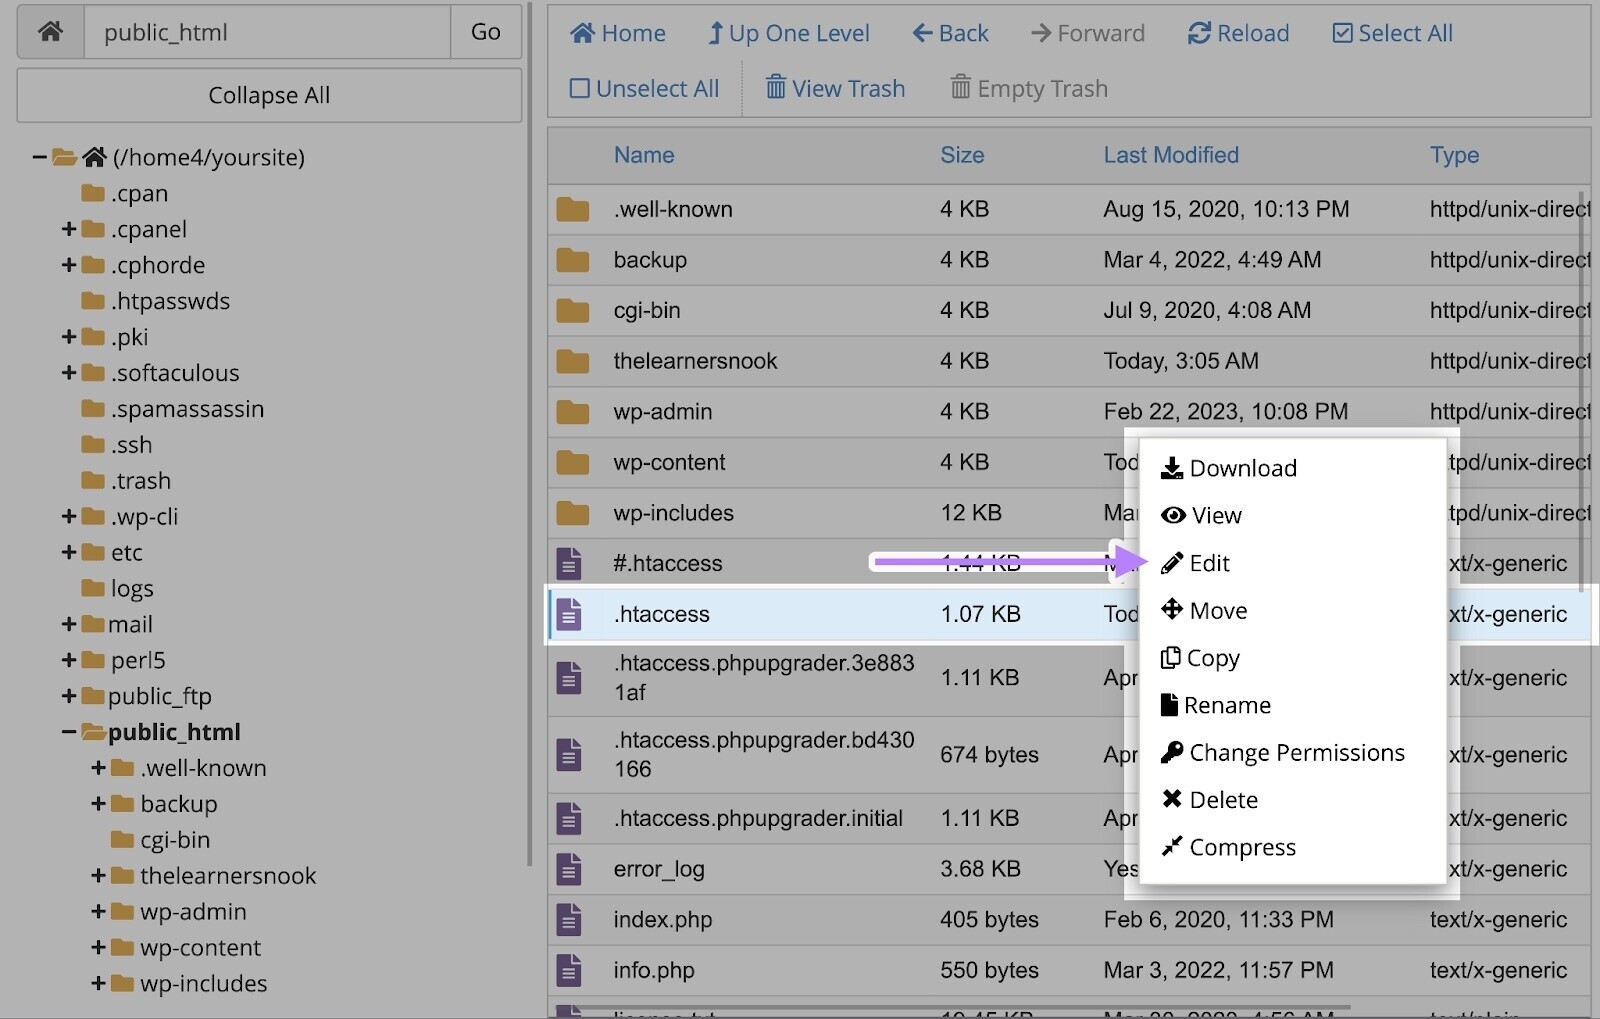
- Once you locate the .htaccess file, right-click on it and select “Edit.”
- Add the redirection rules under the “RewriteEngine On” line.
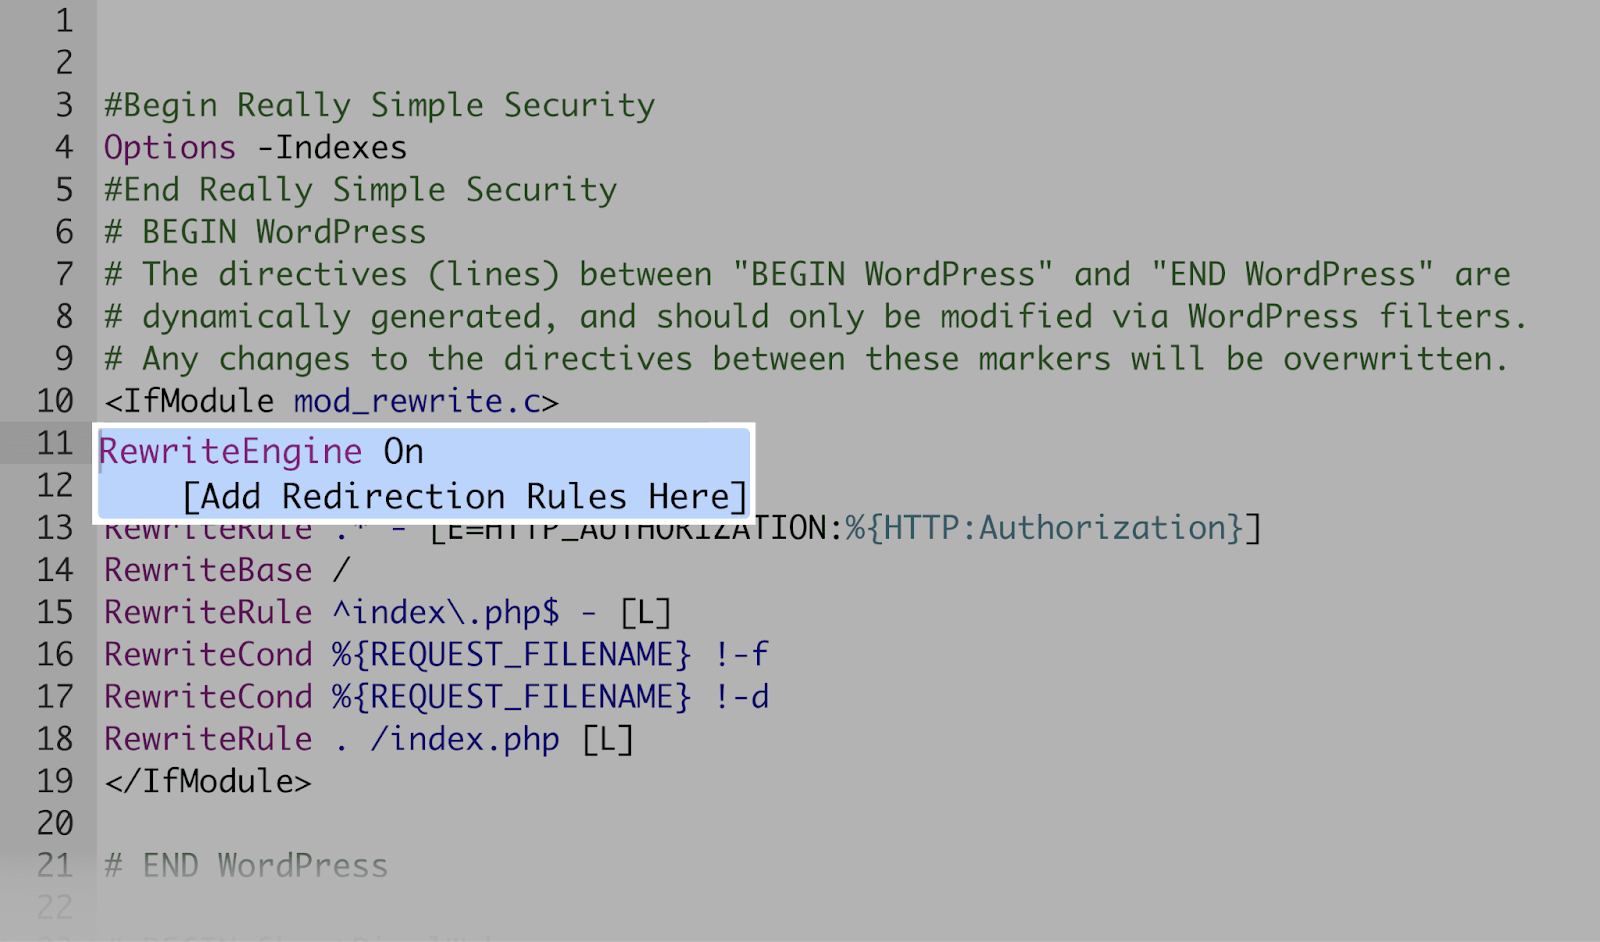
Of course, the redirect rules you use will depend on what you want to redirect.
Redirecting a Single Page
To redirect a single page URL, you’ll need to add the following rule:
Redirect 301 /old-page/ https://www.yourdomain.com/new-page/Ensure that you substitute “/old-page/” and “https://www.yourdomain.com/new-page/” with the real URLs on your site.
For the first part of the rule, you can just mention the URL path. But for the second part, you’ll have to specify the full URL.
Redirecting an Old Domain to New Domain
To redirect an old domain name to new domain name, use the following code:
RewriteCond %{HTTP_HOST} ^(?:www\.)oldsite\.com$ [NC]
RewriteRule ^https://newsite.com%{REQUEST_URI} [L,R=301]
Make sure to use your actual old and new domain names in your redirect rules.
How to Identify & Fix Redirect Issues
To ensure your redirects are implemented correctly and no issues are present, consider auditing your website with Semrush’s Site Audit tool.
The tool can quickly spot any problems your site might have with redirects. Like redirect chains and loops. So you can fix them as soon as possible. First, open the Site Audit tool.
Enter your domain name and click “Start Audit.”

Then the “Site Audit Settings” window will pop up.
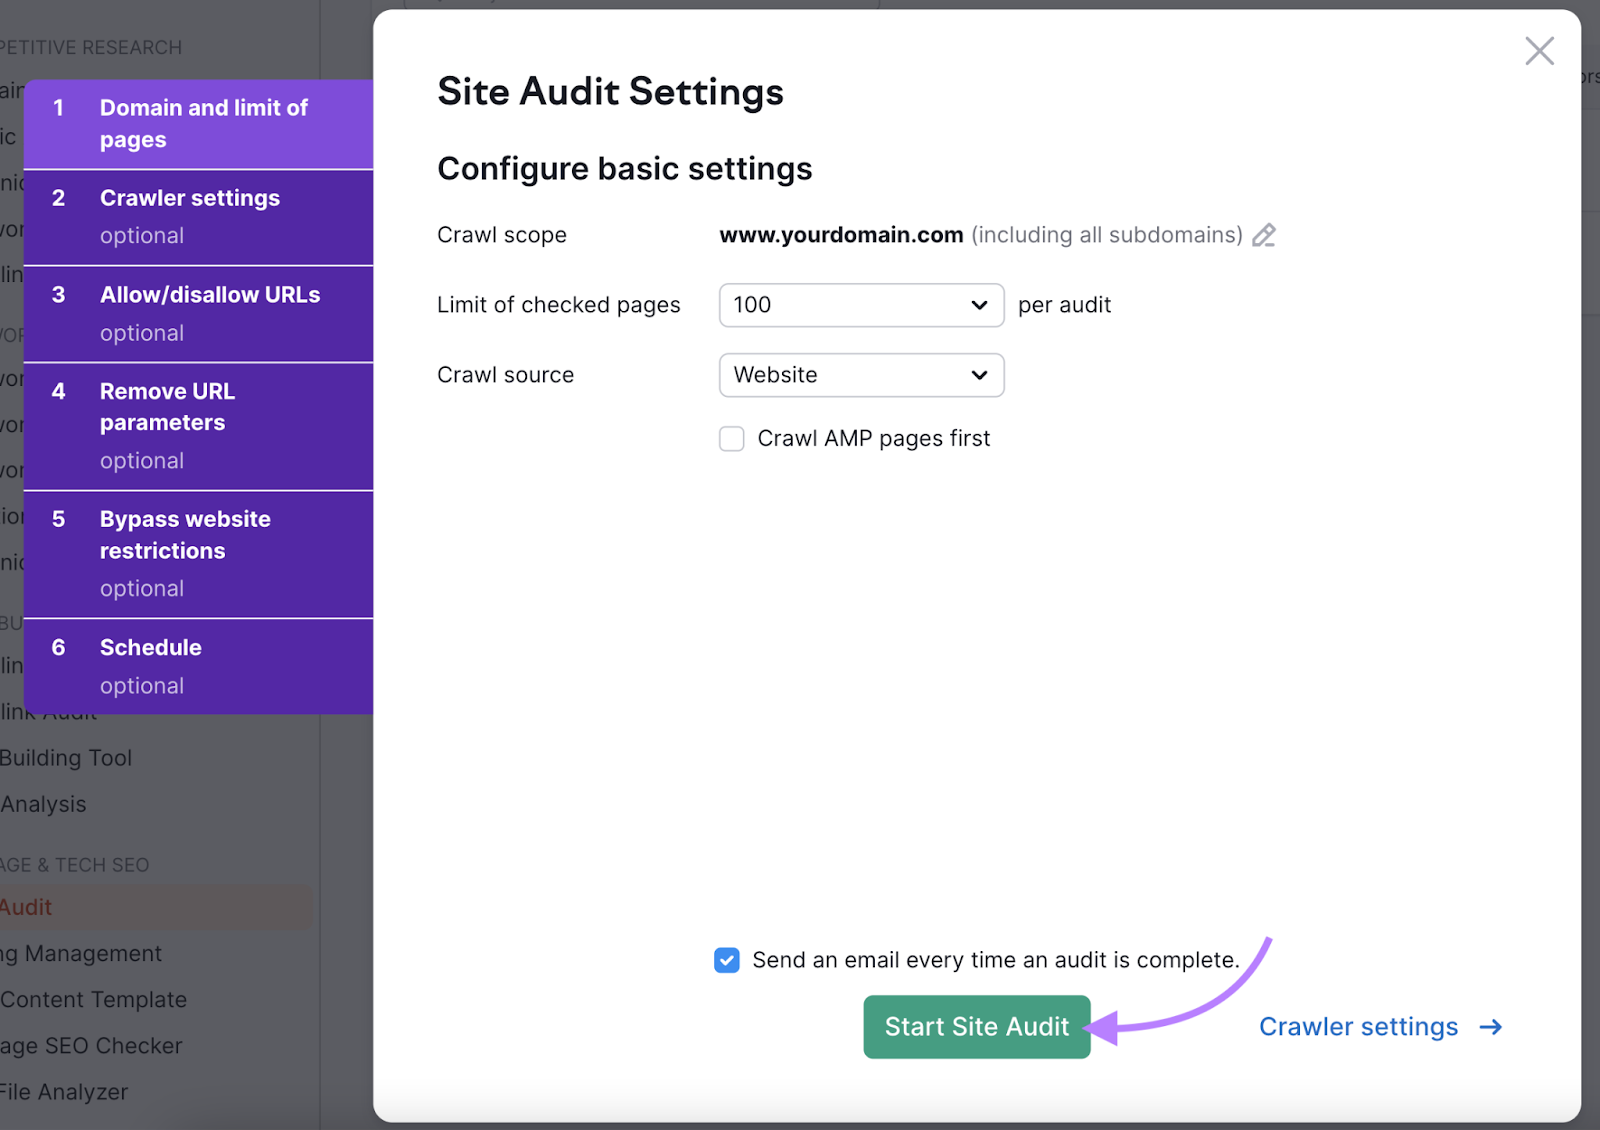
From here, configure the basic audit settings. Then, click “Start Site Audit.”
Once your audit is complete, head over to the “Issues” tab and search for “redirect.” The tool will show whether your site has any redirect-related issues.
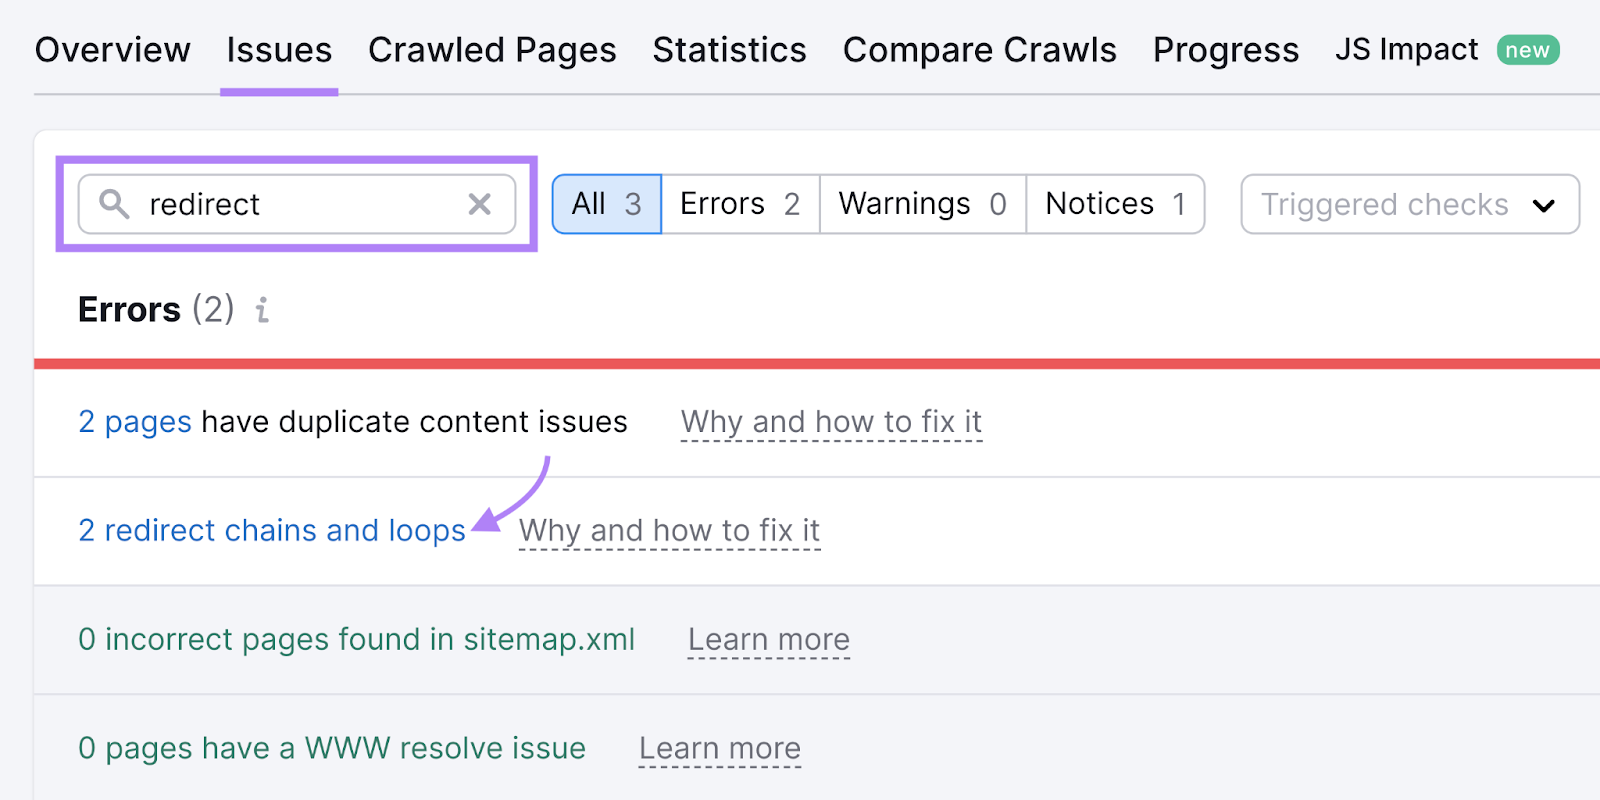
You can click “X redirect chains and loops” to see the exact URLs causing issues.
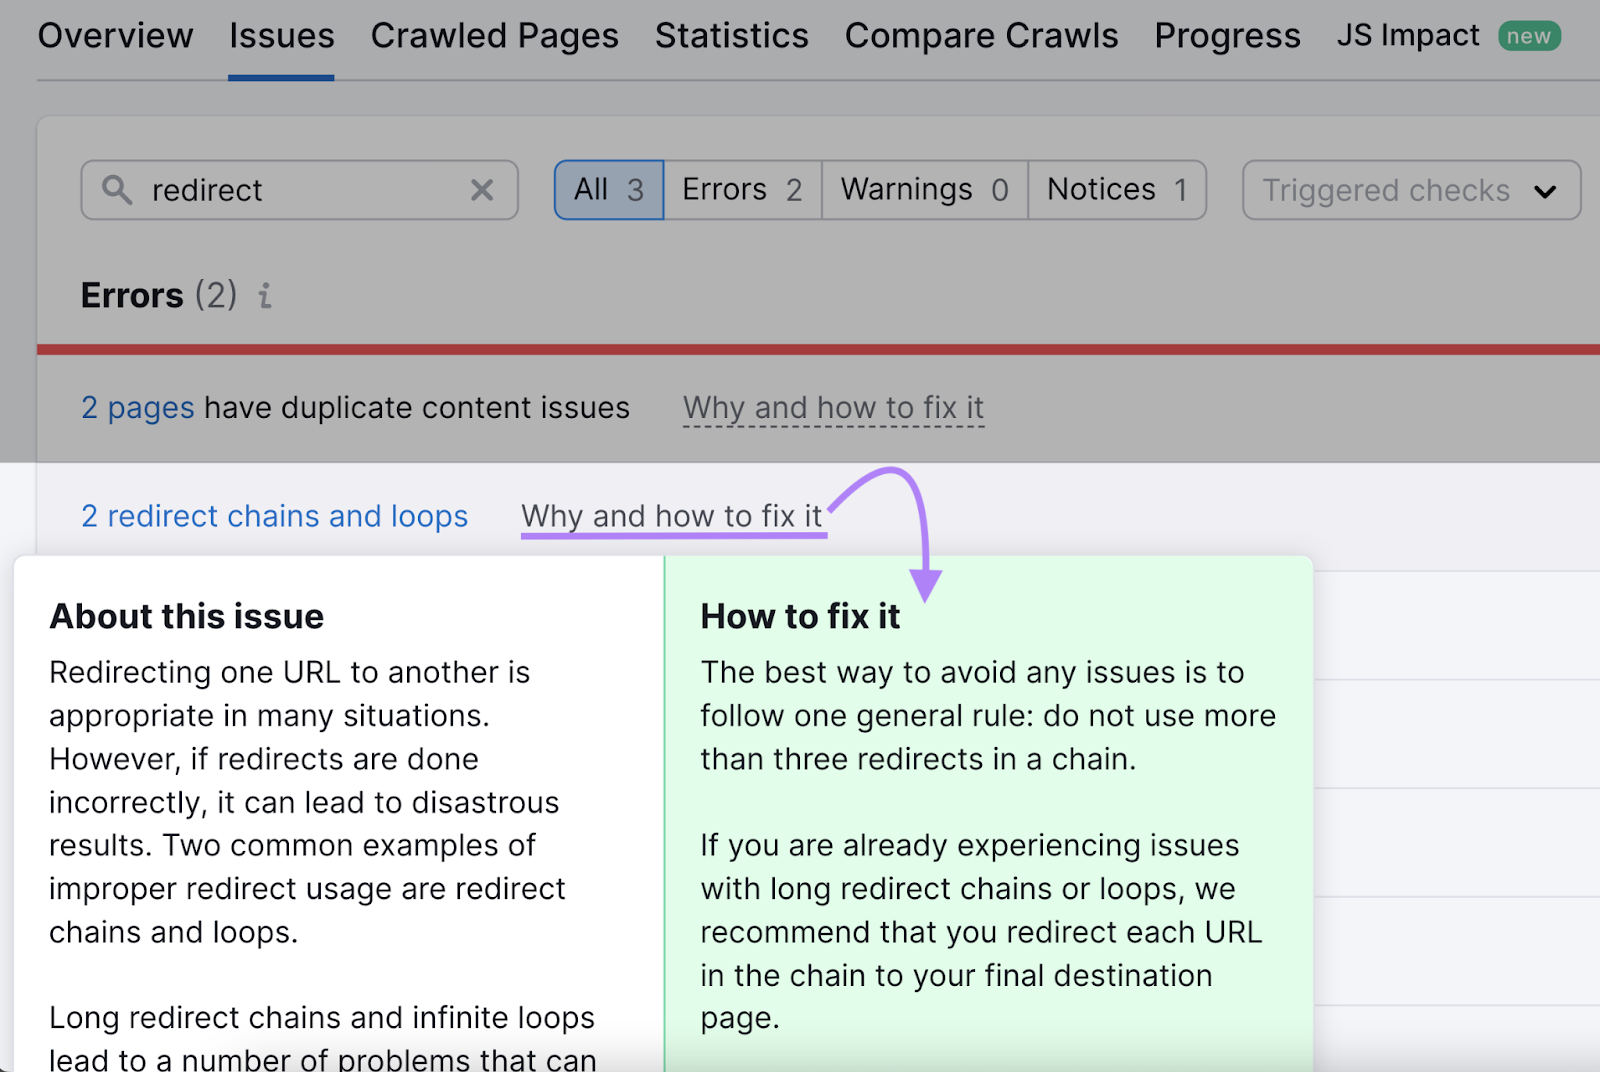
Then, click on the “Why and how to fix it” link to learn how to resolve the issue.
Stay on Top of Redirect Issues
If you implement 301 redirects using an .htaccess file quite regularly, it’s best to schedule periodic audits in the Site Audit tool.
This will alert you of any new issues that might crop up in future as you implement more redirects on your site.
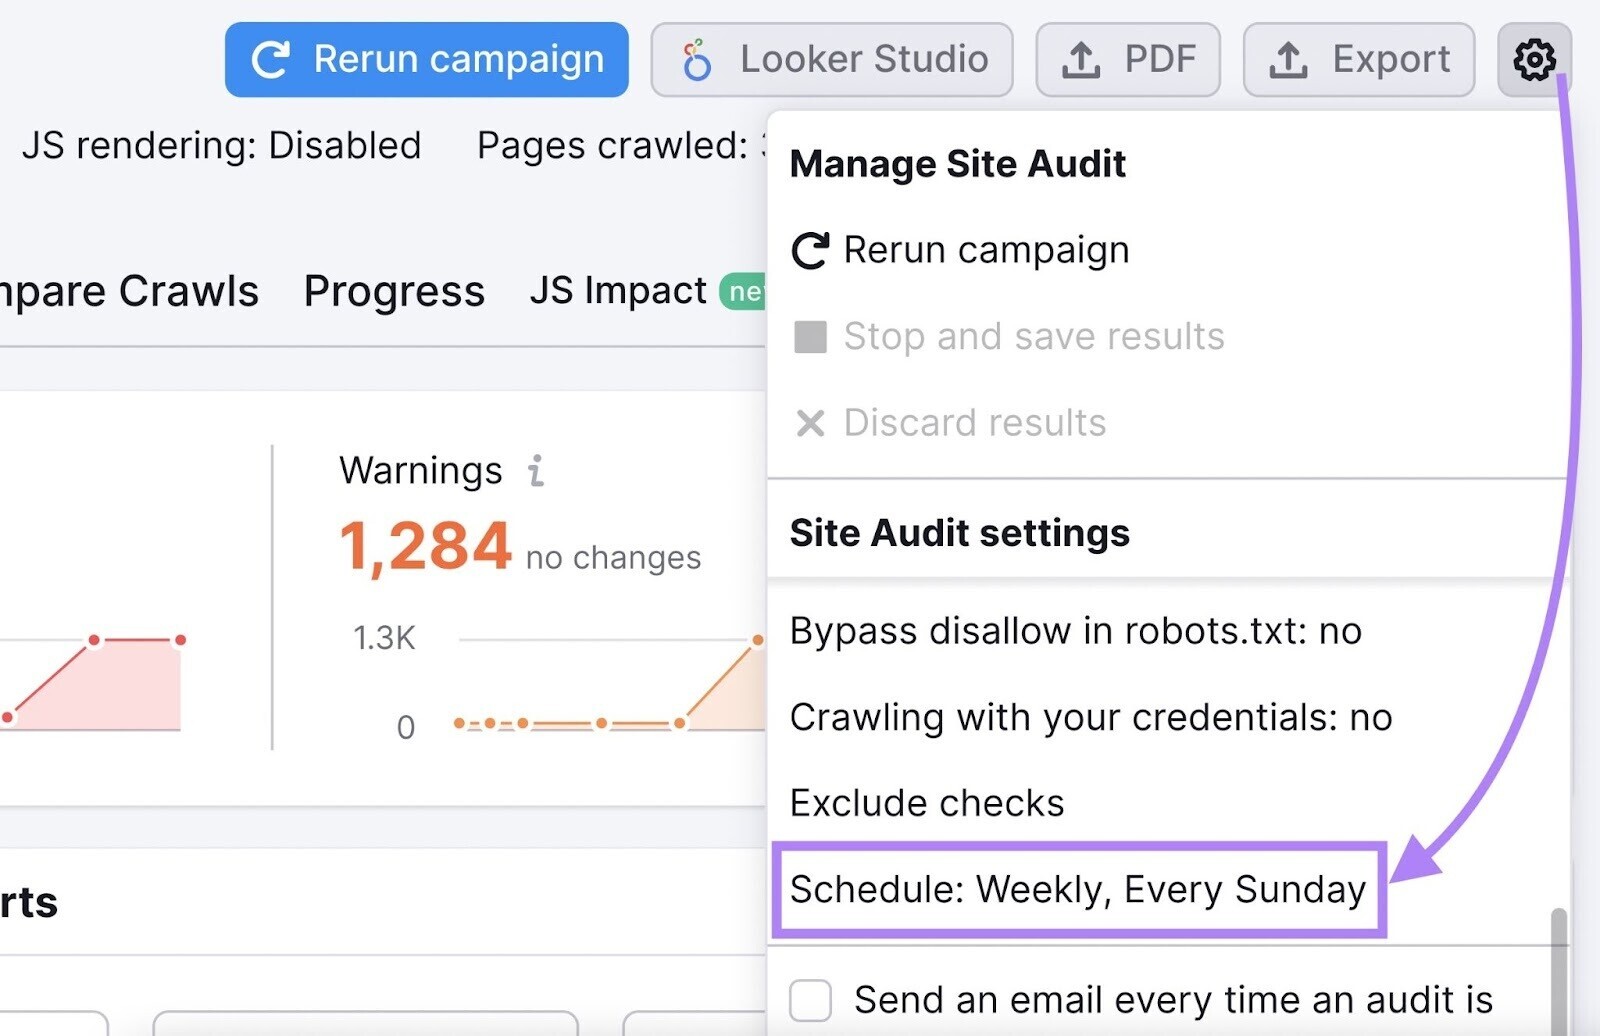
From the Site Audit “Overview” tab, click the cog icon located in the right-hand corner.
Then scroll down to the audit settings and click “Schedule.”
You can schedule daily or weekly audits. Choose the option that best suits your needs and preferences. And click “Save.”
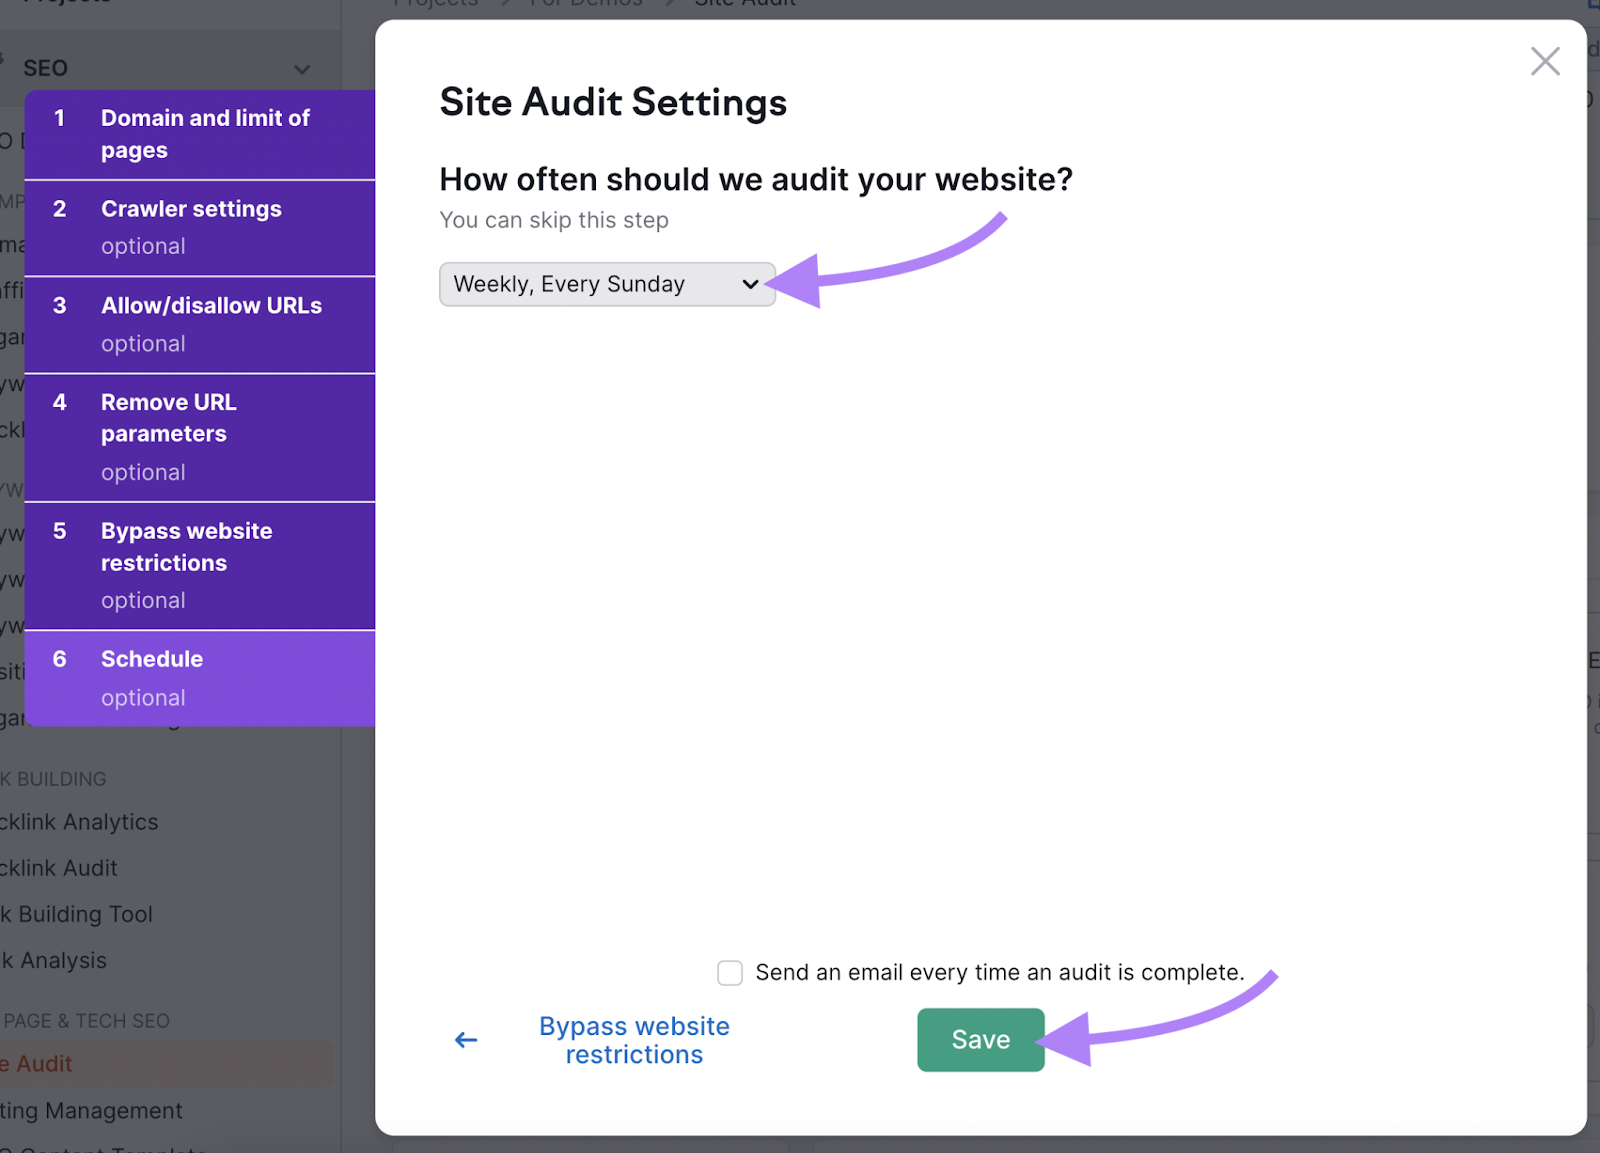
Now the tool will regularly scan your website for redirect issues. Fix them as soon as they arise.
